Loading...  # 一、 **初始化环境** ## **1.默认账号及默认密码** Username: root Password: ChinaSkill22! Username: skills Password: ChinaSkill22! 注:若非特别指定,所有账号的密码均为 ChinaSkill22! ## **2.操作系统配置** 所处区域:CST + 8 系统环境语言:English US (UTF-8) 键盘:English US 注意:当任务是配置TLS,请把根证书或者自签名证书添加到受信任区。 控制台登陆后不管是网络登录还是本地登录,都按下方欢迎信息内容显示 ``` ********************************* ChinaSkills 2022–CSK Module C Linux >>hostname<< >>Linux Version<< >> TIME << ********************************* ``` <div class="panel panel-default collapse-panel box-shadow-wrap-lg"><div class="panel-heading panel-collapse" data-toggle="collapse" data-target="#collapse-78bf7abd4fabbd1ffea6605b516fb47d47" aria-expanded="true"><div class="accordion-toggle"><span style="">Centos</span> <i class="pull-right fontello icon-fw fontello-angle-right"></i> </div> </div> <div class="panel-body collapse-panel-body"> <div id="collapse-78bf7abd4fabbd1ffea6605b516fb47d47" class="collapse collapse-content"><p></p> **一、查询当前所属区域,并设置当前所属区域** [root@localhost ~]# timedatectl list-timezones|grep Asia/Shanghai Asia/Shanghai [root@localhost ~]# timedatectl set-timezone Asia/Shanghai [root@localhost ~]# timedatectl |grep "Time zone" Time zone: Asia/Shanghai (CST, +0800) [root@localhost ~]# **二、编辑动态sh文件** [root@localhost ~]# vim /login.sh ``` #!/bin/bash printf "**************************************\n" printf "%-2s ChinaSkills 2022 - CSK\n" printf "%-8s Module C Linux\n\n\n" printf "%-11s>>"`hostname -s`"<<\n" echo ">>"`cat /etc/centos-release`"<<" echo ">>" `date` "<<" printf "**************************************\n" ``` **三、配置登录输出该sh** [root@localhost ~]# vim /root/.bash_profile 最后一行写入 bash /login.sh **四、关闭本地控制台日志提示** touch一个空的hushlogin这样就不会输出 [root@localhost ~]# touch ~/.hushlogin **五、关闭SSH控制台登录日志** [root@localhost ~]# vim /etc/ssh/sshd_config 修改为 PrintLastLog no 重启SSHD服务 [root@localhost ~]# systemctl restart sshd **六、测试** 本地控制台:  SSH链接测试: 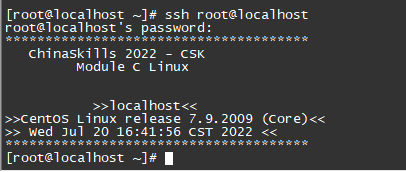 <p></p></div></div></div> <div class="panel panel-default collapse-panel box-shadow-wrap-lg"><div class="panel-heading panel-collapse" data-toggle="collapse" data-target="#collapse-3e54d8b57f36b76cb90439257bd2b63e6" aria-expanded="true"><div class="accordion-toggle"><span style="">Uos</span> <i class="pull-right fontello icon-fw fontello-angle-right"></i> </div> </div> <div class="panel-body collapse-panel-body"> <div id="collapse-3e54d8b57f36b76cb90439257bd2b63e6" class="collapse collapse-content"><p></p> 时区变更: ``` [root@localhost ~]# timedatectl set-timezone Asia/Shanghai [root@localhost ~]# timedatectl |grep "Time zone" Time zone: Asia/Shanghai (CST, +0800) ``` 欢迎配置: ### 方法一: 一、编辑动态sh文件 root@skills-PC:~# vim /login.sh ``` #!/bin/bash printf "**************************************\n" printf "%-2s ChinaSkills 2022 - CSK\n" printf "%-8s Module C Linux\n\n\n" printf "%-11s>>"`hostname -s`"<<\n" printf "%-9s>>"Uos` cat /etc/os-version |grep "MinorVersion" `"<<\n" echo ">>" `date` "<<" printf "**************************************\n" ``` 二、配置登录输出该sh root@skills-PC:~# vim /root/.profile 最后一行写入 bash /login.sh 三、删除控制台登录及ssh后静态motd文件 把静态motd删除: root@skills-PC:~# rm /etc/motd 四、关闭SSH控制台日志提示 注销掉第91行 root@routersrv:~# vim /etc/pam.d/login 90 # (Replaces the `LASTLOG_ENAB' option from login.defs) 91 #session optional pam_lastlog.so 五、关闭ssh控制台登录日志 [root@localhost ]# vim /etc/ssh/sshd_config 修改为no PrintLastLog no 重启sshd服务 root@skills-PC:# systemctl restart ssh ### 方法二: 一、编辑静态motd文件 root@skills-PC:~# vim /etc/motd ``` ********************************* ChinaSkills 2022–CSK Module C Linux >>hostname<< >>Linux Version<< >> TIME << ********************************* ``` 二、关闭ssh控制台登录日志 [root@localhost ]# vim /etc/ssh/sshd_config 修改为no PrintLastLog no 重启sshd服务 root@skills-PC:# systemctl restart ssh <p></p></div></div></div> # 一、 **项目任务描述** 某公司要为员工提供便捷、安全稳定内外网络服务,你作为一个公司网络系统管理员,负责公司网络系统管理,请根据网络拓扑、基本配置信息和服务需求完成网络服务安装与测试,网络拓扑图和基本配置信息如下: ## **1.拓扑图** 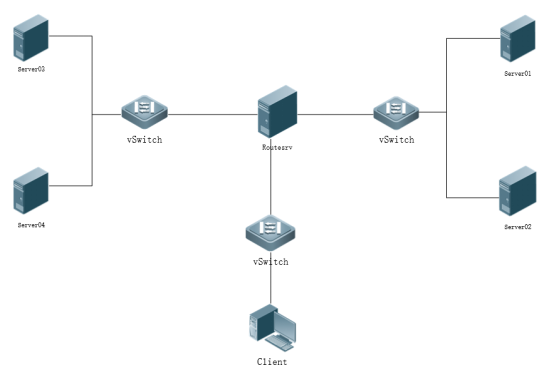 ## **2.基本配置** 服务器和客户端基本配置如下表,各虚拟机已预装系统。 | Device | Hostname | **System** | FQDN | IP Address | Service | | ---------- | ---------- | ------------ | ---------------------------------------------- | ----------------------------------------------------- | -------------------------------------------------------------------- | | Server01 | Server01 | Centos | Server01.sdskills.com | 172.16.100.201 | RAID5<br />NFS<br />DNS<br />Webserver<br />SSH<br />DBM<br />SSDN | | Server02 | Server02 | Centos | Server02.sdskills.com | 172.16.100.202 | FtpMailSSH | | Server03 | Server03 | UOS | Server03.skills.com | 192.168.10.3 | NtpSSH | | Server04 | Server04 | UOS | Server04.skills.com | 192.168.10.X | DNSWebserverSSHLDAP | | Rserver | Rserver | Centos | Rserver.skills.com<br />Rserver.sdskills.com | 172.16.100.254<br />192.168.10.2<br />10.10.100.254 | proxy<br />firewall<br />dhcp<br />SSH<br />CA | | Client | Client | Centos | | 10.10.100.x | none | **网络** | Network | CIDR | | ---------- | ------------------- | | office | 10.10.100.0/24 | | service | 172.16.100.128/25 | | internet | 192.168.10.0/28 | ## **3.任务需求** 任务设备:Client,Rserver,servr01,server02,server03,server04。 注意:若题目中未明确规定,请使用默认配置。 ### ***CLIENT TASK*** **1.Client** **相关任务** **,具体要求如下:** • 作为DNS服务器域名解析测试的客户端,安装nslookup、dig命令行工具; <div class="panel panel-default collapse-panel box-shadow-wrap-lg"><div class="panel-heading panel-collapse" data-toggle="collapse" data-target="#collapse-2c078784e8acc6dd076d294a92a6427167" aria-expanded="true"><div class="accordion-toggle"><span style="">Centos</span> <i class="pull-right fontello icon-fw fontello-angle-right"></i> </div> </div> <div class="panel-body collapse-panel-body"> <div id="collapse-2c078784e8acc6dd076d294a92a6427167" class="collapse collapse-content"><p></p> 先进行本地源搭建 [root@Server ~]# mount /dev/cdrom /mnt [root@Server ~]# cd /etc/yum.repos.d/ [root@Server yum.repos.d]# vi CentOS-Base.repo #修改配置文件,内容如下 > [a] > name=a > baseurl=file:///mnt > enabled=1 > gpgkey=file:///mnt/RPM-GPG-KEY-CentOS-7 [root@Server ~]#yum clean all 清理缓存 [root@Server ~]#yum makecache 重新生成新的yum缓存 [root@Server ~]#yum install -y nslookup dig <p></p></div></div></div> <div class="panel panel-default collapse-panel box-shadow-wrap-lg"><div class="panel-heading panel-collapse" data-toggle="collapse" data-target="#collapse-e39c8d1153c32d5911e7952f9e7df4f459" aria-expanded="true"><div class="accordion-toggle"><span style="">Uos</span> <i class="pull-right fontello icon-fw fontello-angle-right"></i> </div> </div> <div class="panel-body collapse-panel-body"> <div id="collapse-e39c8d1153c32d5911e7952f9e7df4f459" class="collapse collapse-content"><p></p> uslookup与dig有内置 <p></p></div></div></div> • 作为网站访问测试的客户端,安装firefox浏览器, curl命令行测试工具; <div class="panel panel-default collapse-panel box-shadow-wrap-lg"><div class="panel-heading panel-collapse" data-toggle="collapse" data-target="#collapse-1ff3e348cfaae7058f3ec243434f7dad27" aria-expanded="true"><div class="accordion-toggle"><span style="">Centos</span> <i class="pull-right fontello icon-fw fontello-angle-right"></i> </div> </div> <div class="panel-body collapse-panel-body"> <div id="collapse-1ff3e348cfaae7058f3ec243434f7dad27" class="collapse collapse-content"><p></p> [root@Server ~]# yum install -y firefox curl <p></p></div></div></div> <div class="panel panel-default collapse-panel box-shadow-wrap-lg"><div class="panel-heading panel-collapse" data-toggle="collapse" data-target="#collapse-8bbd04cac0501bf511c5f6187eda999e44" aria-expanded="true"><div class="accordion-toggle"><span style="">Uos</span> <i class="pull-right fontello icon-fw fontello-angle-right"></i> </div> </div> <div class="panel-body collapse-panel-body"> <div id="collapse-8bbd04cac0501bf511c5f6187eda999e44" class="collapse collapse-content"><p></p> Tip:需要先把apt源更改为阿里源,然后才可以安装firefox与curl <p></p></div></div></div> • 作为SSH远程登录测试客户端,安装ssh命令行测试工具; <div class="panel panel-default collapse-panel box-shadow-wrap-lg"><div class="panel-heading panel-collapse" data-toggle="collapse" data-target="#collapse-d4532f0eaac15cfc22f9105235efbe4e78" aria-expanded="true"><div class="accordion-toggle"><span style="">Centos</span> <i class="pull-right fontello icon-fw fontello-angle-right"></i> </div> </div> <div class="panel-body collapse-panel-body"> <div id="collapse-d4532f0eaac15cfc22f9105235efbe4e78" class="collapse collapse-content"><p></p> [root@Server ~]# yum install openssh* -y <p></p></div></div></div> <div class="panel panel-default collapse-panel box-shadow-wrap-lg"><div class="panel-heading panel-collapse" data-toggle="collapse" data-target="#collapse-6ed29a8a73b939afea6cbe743c362d6040" aria-expanded="true"><div class="accordion-toggle"><span style="">Uos</span> <i class="pull-right fontello icon-fw fontello-angle-right"></i> </div> </div> <div class="panel-body collapse-panel-body"> <div id="collapse-6ed29a8a73b939afea6cbe743c362d6040" class="collapse collapse-content"><p></p> 默认内置 <p></p></div></div></div> uslookup与dig有内置 • 作为SAMBA测试的客户端,使用图形界面文件浏览器测试, 并安装smbclient工具; <div class="panel panel-default collapse-panel box-shadow-wrap-lg"><div class="panel-heading panel-collapse" data-toggle="collapse" data-target="#collapse-79c504e04d5179ac11751b2059abfca322" aria-expanded="true"><div class="accordion-toggle"><span style="">Centos</span> <i class="pull-right fontello icon-fw fontello-angle-right"></i> </div> </div> <div class="panel-body collapse-panel-body"> <div id="collapse-79c504e04d5179ac11751b2059abfca322" class="collapse collapse-content"><p></p> [root@Server ~]# yum install smbclient* <p></p></div></div></div> <div class="panel panel-default collapse-panel box-shadow-wrap-lg"><div class="panel-heading panel-collapse" data-toggle="collapse" data-target="#collapse-0b795f6b06b48eb31932131a0f03bd6963" aria-expanded="true"><div class="accordion-toggle"><span style="">Uos</span> <i class="pull-right fontello icon-fw fontello-angle-right"></i> </div> </div> <div class="panel-body collapse-panel-body"> <div id="collapse-0b795f6b06b48eb31932131a0f03bd6963" class="collapse collapse-content"><p></p> root@skills-PC:~# sudo aptitude install sambclient <p></p></div></div></div> • 作为FTP测试的客户端,安装lftp命令行工具; <div class="panel panel-default collapse-panel box-shadow-wrap-lg"><div class="panel-heading panel-collapse" data-toggle="collapse" data-target="#collapse-3beeec05b283d0663b8ac49f59bc790b17" aria-expanded="true"><div class="accordion-toggle"><span style="">Centos</span> <i class="pull-right fontello icon-fw fontello-angle-right"></i> </div> </div> <div class="panel-body collapse-panel-body"> <div id="collapse-3beeec05b283d0663b8ac49f59bc790b17" class="collapse collapse-content"><p></p> [root@Server ~]# yum install lftp -y <p></p></div></div></div> <div class="panel panel-default collapse-panel box-shadow-wrap-lg"><div class="panel-heading panel-collapse" data-toggle="collapse" data-target="#collapse-bd355cd28d3e279edf4f703bfce8afe978" aria-expanded="true"><div class="accordion-toggle"><span style="">Uos</span> <i class="pull-right fontello icon-fw fontello-angle-right"></i> </div> </div> <div class="panel-body collapse-panel-body"> <div id="collapse-bd355cd28d3e279edf4f703bfce8afe978" class="collapse collapse-content"><p></p> root@skills-PC:~# sudo aptitude install lftp <p></p></div></div></div> • 作为防火墙规则效果测试客户端,安装ping命令行工具。 <div class="panel panel-default collapse-panel box-shadow-wrap-lg"><div class="panel-heading panel-collapse" data-toggle="collapse" data-target="#collapse-fb0b773606397c0e1a6f2d3f0f9a87c327" aria-expanded="true"><div class="accordion-toggle"><span style="">Centos</span> <i class="pull-right fontello icon-fw fontello-angle-right"></i> </div> </div> <div class="panel-body collapse-panel-body"> <div id="collapse-fb0b773606397c0e1a6f2d3f0f9a87c327" class="collapse collapse-content"><p></p> 默认内置 <p></p></div></div></div> <div class="panel panel-default collapse-panel box-shadow-wrap-lg"><div class="panel-heading panel-collapse" data-toggle="collapse" data-target="#collapse-9e9ff534625c883c3ad66c1893a1a87355" aria-expanded="true"><div class="accordion-toggle"><span style="">Uos</span> <i class="pull-right fontello icon-fw fontello-angle-right"></i> </div> </div> <div class="panel-body collapse-panel-body"> <div id="collapse-9e9ff534625c883c3ad66c1893a1a87355" class="collapse collapse-content"><p></p> 默认内置 <p></p></div></div></div> • 截图的时候请使用上述提到的工具进行功能测试。 ### ***RSERVER TASK*** **1.NETWORK** • 请根据基本配置信息配置服务器的主机名,网卡IP地址配置、域名等。 <div class="panel panel-default collapse-panel box-shadow-wrap-lg"><div class="panel-heading panel-collapse" data-toggle="collapse" data-target="#collapse-9502e28386aed4d271ddcb6553f8c32325" aria-expanded="true"><div class="accordion-toggle"><span style="">Centos</span> <i class="pull-right fontello icon-fw fontello-angle-right"></i> </div> </div> <div class="panel-body collapse-panel-body"> <div id="collapse-9502e28386aed4d271ddcb6553f8c32325" class="collapse collapse-content"><p></p> 方法一 配置文件 cd /etc/sysconifg/ network-scripts cp ifcf-ens33 ifcf-en36 #直接复制文件 uuidgen ens36 >>ifcf-ens36 #查看到的uuid写于ifcf-en36的配置文件的uuid systemclt restart networking 方法二 命令输出 nmcli connection add con-name 33 type ethernet ifname ens33 nmcli conmection modify 网卡 ipv4.address 172.16.100.201/24 nmcli conmection mmodify 网卡 ipv4.method manual 设置静态 nmcli conmection modify 网卡 ipv4.gatway 网关 设置网关 方法三 图像界面 nmtui 配置主机名字 [root@server01 ~]# hostnamectl set-hostname mv 设置名字 [root@server01 ~]# bash 刷新名字 [root@mv ~]# 配置域名 [root@Server01 ~]# vi /etc/hosts 修改hosts 172.16.100.201 Server01.sdskills.com [root@localhost ~]# timedatectl list-timezones|grep Asia/Shanghai 查看区域 是否可用 Asia/Shanghai [root@localhost ~]# timedatectl set-timezone Asia/Shanghai 设置当前所属区域 [root@localhost ~]# timedatectl |grep "Time zone" 查看区域 Time zone: Asia/Shanghai (CST, +0800) [root@localhost ~]# <p></p></div></div></div> <div class="panel panel-default collapse-panel box-shadow-wrap-lg"><div class="panel-heading panel-collapse" data-toggle="collapse" data-target="#collapse-ee82e11671de4ad1e0c30ef884b8890f17" aria-expanded="true"><div class="accordion-toggle"><span style="">uos</span> <i class="pull-right fontello icon-fw fontello-angle-right"></i> </div> </div> <div class="panel-body collapse-panel-body"> <div id="collapse-ee82e11671de4ad1e0c30ef884b8890f17" class="collapse collapse-content"><p></p> **一、修改配置文件并重启** > 第一种:(多网卡可能有问题) > > 进入网络配置文件,添加ip地址及网关信息 > > root@skills-PC:~# vim /etc/network/interfaces > > auto ens33 > iface ens33 inet static > address 10.10.100.254/24 > gateway 10.10.100.254 > > auto ens37 > iface ens37 inet static > address 172.16.100.254/25 > gateway 172.16.100.254 > > auto ens38 > iface ens38 inet static > address 192.168.10.2/28 > gateway 192.168.10.2 > > 保存重启网卡 > > root@skills-PC:~# systemctl restart network-manager.service > > root@skills-PC:~# systemctl restart networking.service > 第二种: > > 网络文件在 /etc/NetworkManager/system-conmections/ > > root@skills-PC:nmcli conmection add con-name ens33 type ethernet ifname ens33 > > root@skills-PC:# nmcli conncetion up ens33 > > root@skills-PC:nmcli connection modify ens33 ipv4.addresses 10.10.100.254/24 > > root@skills-PC:# nmcli connection modify ens33 ipv4.gateway 10.10.100.254 > > root@skills-PC:nmcli conmection add con-name ens37 type ethernet ifname ens33 > > root@skills-PC:# nmcli conncetion up ens37 > > root@skills-PC:nmcli connection modify ens37 ipv4.addresses 172.16.100.254/25 > > root@skills-PC:# nmcli connection modify ens37 ipv4.gateway 172.16.100.254 > > root@skills-PC:nmcli conmection add con-name ens38 type ethernet ifname ens38 > > root@skills-PC:# nmcli conncetion up ens38 > > root@skills-PC:nmcli connection modify ens38 ipv4.addresses 192.168.10.2/28 > > root@skills-PC:# nmcli connection modify ens38 ipv4.gateway 192.168.10.254 查看是否配置成功 root@skills-PC:~# ip a **二、配置主机域名** 完整域名 root@skills-PC:~# hostnamectl set-hostname Rserver root@skills-PC:~# bash 修改hosts root@Rserver:~# vi /etc/hosts 10.10.100.254 Rserver.skills.cn Rserver 测试 root@Rserver:~# hostname Rserver root@Rserver:~# hostname -f Rserver.skills.cn <p></p></div></div></div> **2.squid** • 安装squid服务,开启路由转发,为当前实验环境提供路由功能; <div class="panel panel-default collapse-panel box-shadow-wrap-lg"><div class="panel-heading panel-collapse" data-toggle="collapse" data-target="#collapse-7c7b324536ed0250b717c183780e7bcd29" aria-expanded="true"><div class="accordion-toggle"><span style="">Centos</span> <i class="pull-right fontello icon-fw fontello-angle-right"></i> </div> </div> <div class="panel-body collapse-panel-body"> <div id="collapse-7c7b324536ed0250b717c183780e7bcd29" class="collapse collapse-content"><p></p> [root@localhost ~]# yum install squid –y [root@localhost ~]# systemctl start squid **配置路由转发,提供路由功能** 临时开启 echo "1" >> /proc/sys/net/ipv4/ip_forward 永久开启 echo "net.ipv4.ip_forward = 1" >> /etc/sysctl.conf sysctl -p net.ipv4.ip_forward = 1 图形界面打开火狐浏览器找到网络设置 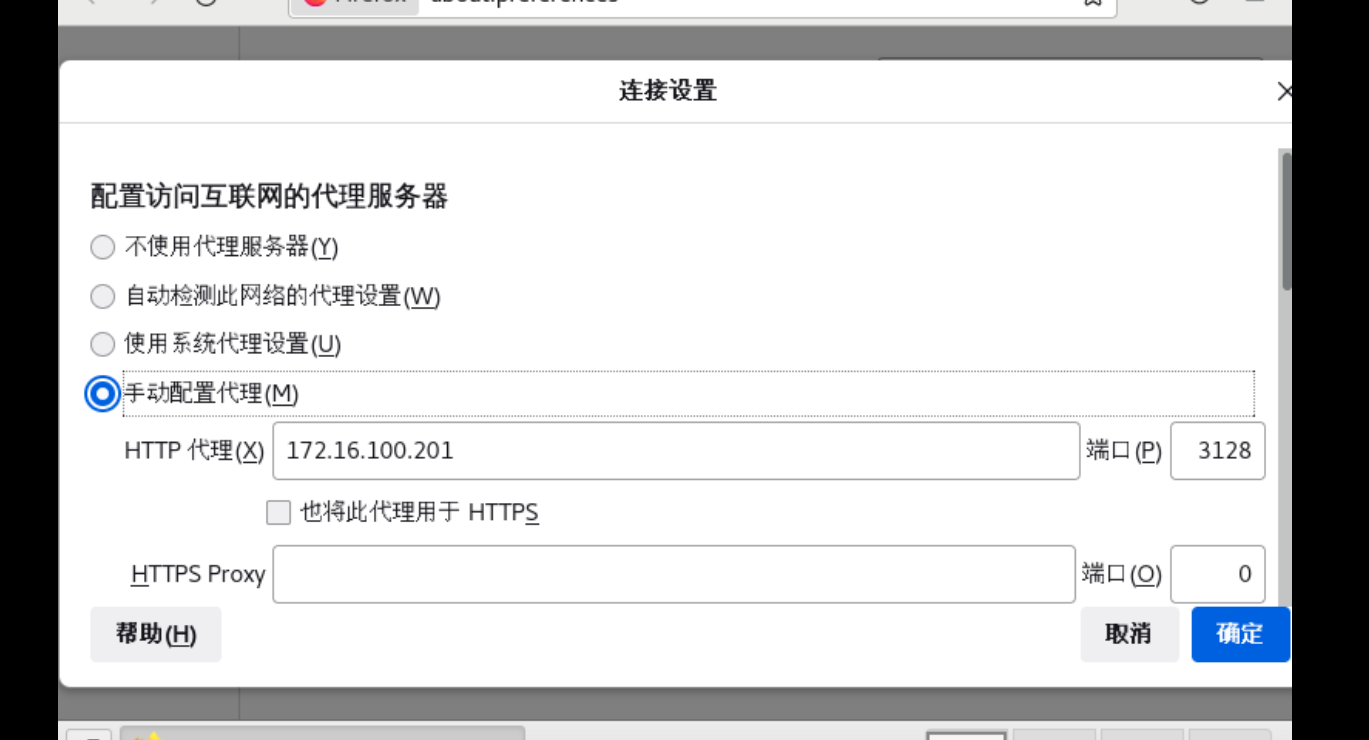 变成手动 输入ip 端口 <p></p></div></div></div> <div class="panel panel-default collapse-panel box-shadow-wrap-lg"><div class="panel-heading panel-collapse" data-toggle="collapse" data-target="#collapse-11e8760dd78996572229682bb223490328" aria-expanded="true"><div class="accordion-toggle"><span style="">uos</span> <i class="pull-right fontello icon-fw fontello-angle-right"></i> </div> </div> <div class="panel-body collapse-panel-body"> <div id="collapse-11e8760dd78996572229682bb223490328" class="collapse collapse-content"><p></p> **一、关闭防火墙** root@Rserver:~# systemctl stop firewalld **二、安装Squid服务,并启动** root@Rserver:~# aptitude install squid **三、配置路由转发,提供路由功能** 临时开启 root@Rserver:~# echo "1" >> /proc/sys/net/ipv4/ip_forward 永久开启 root@Rserver:~# echo "net.ipv4.ip_forward = 1" >> /etc/sysctl.conf root@Rserver:~# sysctl -p net.ipv4.ip_forward = 1 <p></p></div></div></div> **3.Iptables** • 默认阻挡所有流量 • 添加必要的NAT规则和流量放行规则,正常情况下Internet网络不能访问office网络,满足使所有要求中的服务正常提供工作。 <div class="panel panel-default collapse-panel box-shadow-wrap-lg"><div class="panel-heading panel-collapse" data-toggle="collapse" data-target="#collapse-4d2f30253a60ba0182592c05121eb23c33" aria-expanded="true"><div class="accordion-toggle"><span style="">Centos和Uos</span> <i class="pull-right fontello icon-fw fontello-angle-right"></i> </div> </div> <div class="panel-body collapse-panel-body"> <div id="collapse-4d2f30253a60ba0182592c05121eb23c33" class="collapse collapse-content"><p></p> 默认阻挡所有流量 ```bash iptables -A INPUT -s 0.0.0.0/0 -j REJECT ``` 192.168.10.0/24 禁止访问 192.168.1.0/24 ```bash iptables -A INPUT -s 192.168.10.0/24 -d 192.168.1.0/24 -j REJECT ``` 上面的命令将丢掉所有来自 所有 网络的网络包,而将只允许192.168.1.0/24网络和10.1.100.0/24网络通过端口 22 的流入流量。 ```bash iptables -A INPUT -S 0.0.0.0/0 -j DROP iptables -I INPUT -s 192.168.1.0/24 -p tcp -m tcp --dport 22 -j ACCEPT iptables -I INPUT -s 10.1.100.0/24 -p tcp -m tcp --dport 22 -j ACCEPT ``` Server1 192.168.10.134 Server2 192.168.10.132 Server2 10.1.100.129 Server3 10.1.100.128 10.1.100.0/24网络不能访问除了192.168.10.132以外的192.168.10.0/24网络 ```bash iptables -A FORWARD -s 10.1.100.0/24 -d 192.168.10.0/24 -j REJECT ``` 10.1.100.0/24网络不能访问192.168.10.132 ```bash iptables -A OUTPUT -s 10.1.100.0/24 -d 192.168.10.0/24 -j REJECT ``` 10.1.100.0/24网络不能访问192.168.10.0/24网络 ```bash iptables -A FORWARD -s 10.1.100.0/24 -d 192.168.10.0/24 -j REJECT iptables -A FORWARD -s 10.1.100.0/24 -d 192.168.10.0/24 -j REJECT ``` <p></p></div></div></div> **4.DHCP** • 为客户端分配IP范围是10.10.100.1-10.10.100.50; • DNS:按照实际需求配置DNS服务器地址选项; • GATEWAY:按照实际需求配置网关地址选项。 <div class="panel panel-default collapse-panel box-shadow-wrap-lg"><div class="panel-heading panel-collapse" data-toggle="collapse" data-target="#collapse-f44e3522652be5e7160e9cb5ffbc6a4a37" aria-expanded="true"><div class="accordion-toggle"><span style="">Centos</span> <i class="pull-right fontello icon-fw fontello-angle-right"></i> </div> </div> <div class="panel-body collapse-panel-body"> <div id="collapse-f44e3522652be5e7160e9cb5ffbc6a4a37" class="collapse collapse-content"><p></p> yum install dhcp –y vim /etc/dhcp/dhcpd.conf 配置文件 ``` option domain-name "skills.com"; option domain-name-servers 172.16.100.201; default-lease-time 600; max-lease-time 7200; subnet 10.10.100.0 netmask 255.255.255.0 { option routers 10.10.100.254; range 10.10.100.1 10.10.100.50; } ``` Systemclt restart dhcp.service 启动 <p></p></div></div></div> <div class="panel panel-default collapse-panel box-shadow-wrap-lg"><div class="panel-heading panel-collapse" data-toggle="collapse" data-target="#collapse-46180403ed6ffc44a6cd7cb4d6a5b22218" aria-expanded="true"><div class="accordion-toggle"><span style="">uos</span> <i class="pull-right fontello icon-fw fontello-angle-right"></i> </div> </div> <div class="panel-body collapse-panel-body"> <div id="collapse-46180403ed6ffc44a6cd7cb4d6a5b22218" class="collapse collapse-content"><p></p> **一、安装dhcp** root@Rserver:~# apt-get install isc-dhcp-common=4.2.4-7ubuntu12.13 root@Rserver:~# apt-get install isc-dhcp-server **二、编辑和配置dhcp** root@Rserver:~# vim /etc/dhcp/dhcpd.conf ``` option domain-name "skills.com"; option domain-name-servers 10.10.100.254; default-lease-time 600; max-lease-time 7200; subnet 10.10.100.0 netmask 255.255.255.0 { range 10.10.100.1 10.10.100.50; option routers 10.10.100.254; } ``` 将监听端口修改为对应网卡,代码如下: root@Rserver:~# vim /etc/default/isc-dhcp-server INTERFACES="ens33" **三、启动置dhcp服务** root@Rserver:~# systemctl restart isc-dhcp-server **四、客户端测试** root@Rserver:~# vim /etc/sysconfig/network-scripts/ifcfg-ens33 BOOTPROTO=dhcp ONBOOT=yes 重启网卡 root@Rserver:~# systemctl restart network <p></p></div></div></div> **5.SSH** 安装SSH 仅允许client客户端进行ssh访问,其余所有主机的请求都应该拒绝; 配置client只能在Chinaskill22用户环境下可以免秘钥登录,端口号为2022,并且拥有root控制权限。 <div class="panel panel-default collapse-panel box-shadow-wrap-lg"><div class="panel-heading panel-collapse" data-toggle="collapse" data-target="#collapse-dcaa64938216beb832735f3bf53af01e35" aria-expanded="true"><div class="accordion-toggle"><span style="">Centos</span> <i class="pull-right fontello icon-fw fontello-angle-right"></i> </div> </div> <div class="panel-body collapse-panel-body"> <div id="collapse-dcaa64938216beb832735f3bf53af01e35" class="collapse collapse-content"><p></p> [root@Rserver ~]# yum install openssh –y [root@Rserver ~]# vim /etc/ssh/sshd_config 设置端口 port 2022 [root@Rserver ~]# systemctl restart sshd [root@Rserver ~]# vim /etc/hosts.allow 设置规则 只允许 Client这个ip sshd:10.10.100.1:allow 拒接所有 [root@Rserver ~]# vim /etc/hosts.deny sshd:ALL 创建用户 [root@client ~]# useradd Chinaskill22 [root@client ~]# su Chinaskill22 [Chinaskill22@client root]$ ssh-keygen 生成密钥 复制密钥到RServer服务器 [Chinaskill22@client root]$ ssh-copy-id root@10.10.100.254 -p 2022 复制密钥到RServer服务器 <p></p></div></div></div> <div class="panel panel-default collapse-panel box-shadow-wrap-lg"><div class="panel-heading panel-collapse" data-toggle="collapse" data-target="#collapse-84672df3774062c7f8e143608470e67c93" aria-expanded="true"><div class="accordion-toggle"><span style="">Uos</span> <i class="pull-right fontello icon-fw fontello-angle-right"></i> </div> </div> <div class="panel-body collapse-panel-body"> <div id="collapse-84672df3774062c7f8e143608470e67c93" class="collapse collapse-content"><p></p> **一、安装ssh** root@Rserver:~# apt install openssh –y **二、编辑ssh配置文件、端口** root@Rserver:~# vim /etc/ssh/sshd_config port 2022 **三、重启ssh服务** root@Rserver:~# systemctl restart sshd **四、设置规则** root@Rserver:~# vim /etc/hosts.allow 只允许Client这个ip sshd:10.10.100.1:allow 拒接所有 root@Rserver:~# vim /etc/hosts.deny sshd:ALL <p></p></div></div></div> **6.CA** • CA根证书路径/CA/cacert.pem; • 签发数字证书,颁发者信息: 国家 = CN 单位 = Inc 组织机构 = www.skills.com 公用名 = Skill Global Root CA • 创建用户组ldsgp ,将zsuser、lsusr、wuusr添加到组内。 <div class="panel panel-default collapse-panel box-shadow-wrap-lg"><div class="panel-heading panel-collapse" data-toggle="collapse" data-target="#collapse-ec5e1cc8433863766cdb16b4270f510737" aria-expanded="true"><div class="accordion-toggle"><span style="">Centos</span> <i class="pull-right fontello icon-fw fontello-angle-right"></i> </div> </div> <div class="panel-body collapse-panel-body"> <div id="collapse-ec5e1cc8433863766cdb16b4270f510737" class="collapse collapse-content"><p></p> **一、安装Openssl** [root@Rserver ~]# yum install openssl –y **二、建立根证书存放目录** [root@Rserver ~]# mkdir /CA [root@Rserver ~]# cd /CA [root@Rserver CA]# mkdir certs #存放已颁发的证书 [root@Rserver CA]# mkdir newcerts #存放CA指令生成的新证书 [root@Rserver CA]# mkdir private #存放私钥 [root@Rserver CA]# touch index.txt #已签发证书的文本数据文件 [root@Rserver CA]# vim serial #证书签发时使用的序列号参考文件 01 [root@Rserver CA]# openssl genrsa -out private/cakey.pem 4096 #生成一个密钥,长度4096 Generating RSA private key, 4096 bit long modulus ............................................++ ..........................................++e is 65537 (0x10001) [root@Rserver CA]# [root@Rserver CA]# openssl req -new -x509 -key private/cakey.pem -out cacert.pem 签发数字证书,颁发者信息 You are about to be asked to enter information that will be incorporated into your certificate request. What you are about to enter is what is called a Distinguished Name or a DN. There are quite a few fields but you can leave some blank For some fields there will be a default value, If you enter '.', the field will be left blank. --- Country Name (2 letter code) [XX]:CN State or Province Name (full name) []: Locality Name (eg, city) [Default City]: Organization Name (eg, company) [Default Company Ltd]:Inc Organizational Unit Name (eg, section) []:www.skills.com Common Name (eg, your name or your server's hostname) []:Skill Gloabl Root CA Email Address []: [root@Rserver CA]# **三、测试** **生成一个秘钥** [root@Rserver CA]# openssl genrsa -out private/apache2.key Generating RSA private key, 2048 bit long modulus ......+++.............................+++ e is 65537 (0x10001) **生成一个证书** [root@Rserver CA]# openssl req -new -key private/apache2.key -out certs/apache2.csr You are about to be asked to enter information that will be incorporated into your certificate request. What you are about to enter is what is called a Distinguished Name or a DN. There are quite a few fields but you can leave some blank For some fields there will be a default value, If you enter '.', the field will be left blank. --- Country Name (2 letter code) [XX]:CN State or Province Name (full name) []: Locality Name (eg, city) [Default City]: Organization Name (eg, company) [Default Company Ltd]:Inc Organizational Unit Name (eg, section) []:www.skills.com Common Name (eg, your name or your server's hostname) []:www.skills.com Email Address []: Please enter the following 'extra' attributes to be sent with your certificate request A challenge password []: An optional company name []: **使用私钥进行签名** [root@Rserver CA]# openssl x509 -req -in /CA/certs/apache2.csr -CA cacert.pem -CAkey private/cakey.pem -CAcreateserial -out apache2.crt -days 365 Signature ok subject=/C=CN/L=Default City/O=Inc/OU=www.skills.com/CN=www.skills.com Getting CA Private Key [root@Rserver CA]# <p></p></div></div></div> <div class="panel panel-default collapse-panel box-shadow-wrap-lg"><div class="panel-heading panel-collapse" data-toggle="collapse" data-target="#collapse-c7a42d0507b4450db8319a730f37386c98" aria-expanded="true"><div class="accordion-toggle"><span style="">Uos</span> <i class="pull-right fontello icon-fw fontello-angle-right"></i> </div> </div> <div class="panel-body collapse-panel-body"> <div id="collapse-c7a42d0507b4450db8319a730f37386c98" class="collapse collapse-content"><p></p> **一、安装Openssl** root@skills-PC:~# apt install openssl -y **二、建立根证书存放目录** **创建目录及文件** root@skills-PC:~# mkdir /CA root@skills-PC:~# cd /CA root@skills-PC:~# mkdir certs #存放已颁发的证书 root@skills-PC:~# mkdir newcerts #存放CA指令生成的新证书 root@skills-PC:~# mkdir private #存放私钥 root@skills-PC:~# touch index.txt #已签发证书的文本数据文件 root@skills-PC:~# echo 01 > serial #证书签发时使用的序列号参考文件 **生成证书** root@skills-PC:~# openssl ``` genrsa -out private/cakey.pem 4096 #生成一个密钥,长度4096 req -new -x509 -key private/cakey.pem -out cacert.pem 签发数字证书,颁发者信息 Country Name (2 letter code) [AU]:CN State or Province Name (full name) [Some-State]: Locality Name (eg, city) []: Organization Name (eg, company) [Internet Widgits Pty Ltd]:Inc Organizational Unit Name (eg, section) []:www.skills.com Common Name (e.g. server FQDN or YOUR name) []:Skill Global Root CA Email Address []: ``` <p></p></div></div></div> **7.Web Proxy** • 安装Nginx组件; • 配置文件名为proxy.conf,放置在/etc/nginx/conf.d/目录下; • 为www.chinaskills.cn配置代理前端,通过HTTPS的访问后端Web服务器; • 后端服务器日志内容需要记录真实客户端的IP地址。 • 缓存后端Web服务器上的静态页面。 • 创建服务监控脚本:/shells/chkWeb.sh • 编写脚本监控公司的网站运行情况; • 脚本可以在后台持续运行; • 每隔3S检查一次网站的运行状态,如果发现异常尝试3次; • 如果确定网站无法访问,则返回用户“网站正在维护中,请您稍后再试”的页面。 <div class="panel panel-default collapse-panel box-shadow-wrap-lg"><div class="panel-heading panel-collapse" data-toggle="collapse" data-target="#collapse-3d58d8469878fad88484c8c504ac427458" aria-expanded="true"><div class="accordion-toggle"><span style="">Centos</span> <i class="pull-right fontello icon-fw fontello-angle-right"></i> </div> </div> <div class="panel-body collapse-panel-body"> <div id="collapse-3d58d8469878fad88484c8c504ac427458" class="collapse collapse-content"><p></p> **一、关闭Selinux和防火墙** [root@localhost ~]# setenforce 0 [root@localhost ~]# systemctl stop firewalld **二、上传安装包并安装Nginx** 使用WinSCP上传到/root 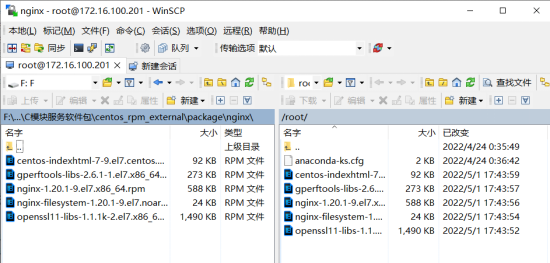  [root@Rserver ~]# yum install centos-indexhtml-7-9.el7.centos.noarch.rpm gperftools-libs-2.6.1-1.el7.x86_64.rpm nginx-1.20.1-9.el7.x86_64.rpm nginx-filesystem-1.20.1-9.el7.noarch.rpm openssl11-libs-1.1.1k-2.el7.x86_64.rpm –y **三、创建Nginx配置并代理和缓存** 代理配置 [root@Rserver /]# vim /etc/nginx/conf.d/proxy.conf ``` [root@Rserver /]# vim /etc/nginx/conf.d/proxy.conf server { listen 80; server_name proxy.chinaskills.cn; location / {proxy_pass https://www.chinaskills.cn;} location ~ .*\.(gif|jpg|png|css|js|ico)$ { proxy_pass https://www.chinaskills.cn; proxy_cache proxy; proxy_set_header Host $host; proxy_cache_valid 200 301 302 5m; } } ``` 缓存配置 在http下面添加 [root@Rserver /]# vim /etc/nginx/nginx.conf http { proxy_cache_path /cache levels=1:2 keys_zone=proxy:20m max_size=20m; 创建缓存目录 [root@Rserver /]# mkdir /cache 记录真实ip地址 多了一条proxy_set_header X-Real-IP $remote_addr; [root@Rserver /]# vim /etc/nginx/conf.d/proxy.conf ``` server { listen 80; server_name proxy.chinaskills.cn; location / {proxy_pass https://www.chinaskills.cn;} location ~ .*\.(gif|jpg|png|css|js|ico)$ { proxy_pass https://www.chinaskills.cn; proxy_cache proxy; proxy_set_header Host $host; proxy_cache_valid 200 301 302 5m; proxy_set_header X-Real-IP $remote_addr; } } ``` 再去后端的apache日志设置一下就可以 找到196行,把h改成%{X-Real-IP}i [root@Server02 ~]# vim /etc/httpd/conf/httpd.conf LogFormat "%{X-Real-IP}i %l %u %t \"%r\" %>s %b \"%{Referer}i\" \"%{User-Age nt}i\"" combined ## 196行 创建一个测试网页 [root@Server02 html]# vim /etc/httpd/conf.d/ssl.conf DocumentRoot "/var/www/html" # 注销掉59行 重启httpd [root@Server02 html]# echo "测试" >> /var/www/html/index.html [root@Server02 ~]# systemctl restart httpd 重启服务 注意:必须要ping通代理的那台web服务域名否则启动不了 [root@Rserver /]# systemctl restart nginx Job for nginx.service failed because the control process exited with error code. See "systemctl status nginx.service" and "journalctl -xe" for details. [root@Rserver /]# ping www.chinaskills.cn ping: www.chinaskills.cn: Name or service not known [root@Rserver /]# ping www.chinaskills.cn PING www.chinaskills.cn (172.16.100.202) 56(84) bytes of data. 64 bytes from www.chinaskills.cn (172.16.100.202): icmp_seq=1 ttl=64 time=0.304 ms ^C --- www.chinaskills.cn ping statistics --- 1 packets transmitted, 1 received, 0% packet loss, time 0ms rtt min/avg/max/mdev = 0.304/0.304/0.304/0.000 ms [root@Rserver /]# systemctl restart nginx **四、测试** 刚开始缓存目录里是空的 [root@Rserver /]# ls /cache/ [root@Rserver /]# 接下来访问一下,访问2个站点一个带图片一个普通的   里面就加了内容缓存的网页 [root@Rserver ~]# ls /cache/ 6 [root@Rserver ~]# **五、创建服务监控脚本:/shells/chkWeb.sh** [root@Rserver ~]# mkdir /shells [root@Rserver ~]# vim /shells/chkWeb.sh ``` #!/bin/bash url=https://www.chinaskills.cn o=`curl -s -k $url -I |grep 'OK' |awk '{print $2}'` while [ true ]; do /bin/sleep 3 if [[ $o -eq 200 ]];then echo "$url 正常打开 3s" else for i in 1 2 3;do if [[ $o -eq 200 ]];then echo "$url 正常打开" else echo "$url 异常 $i" fi done echo "网站正在维护中..." fi done ``` 运行测试 [root@Rserver ~]# bash /shells/chkWeb.sh https://www.chinaskills.cn 正常打开 3s https://www.chinaskills.cn 正常打开 3s https://www.chinaskills.cn 正常打开 3s 关闭后端网站再测试 [root@Server02 ~]# systemctl stop httpd [root@Rserver ~]# bash /shells/chkWeb.sh https://www.chinaskills.cn 异常 1 https://www.chinaskills.cn 异常 2 https://www.chinaskills.cn 异常 3 网站正在维护中... <p></p></div></div></div> ### ***SERVER01 TASK*** **1.NETWORK** • 请根据基本配置信息配置服务器的主机名,网卡IP地址配置、域名服务器、网关等。 <div class="panel panel-default collapse-panel box-shadow-wrap-lg"><div class="panel-heading panel-collapse" data-toggle="collapse" data-target="#collapse-8ed3ffb5dedcc37bceda0a1d6c88b56f94" aria-expanded="true"><div class="accordion-toggle"><span style="">Centos</span> <i class="pull-right fontello icon-fw fontello-angle-right"></i> </div> </div> <div class="panel-body collapse-panel-body"> <div id="collapse-8ed3ffb5dedcc37bceda0a1d6c88b56f94" class="collapse collapse-content"><p></p> 方法一 配置文件 cd /etc/sysconifg/ network-scripts cp ifcf-ens33 ifcf-en36 #直接复制文件 uuidgen ens36 >>ifcf-ens36 #查看到的uuid写于ifcf-en36的配置文件的uuid systemclt restart networking 方法二 命令输出 nmcli connection add con-name 33 type ethernet ifname ens33 nmcli conmection modify 网卡 ipv4.address 172.16.100.201/24 nmcli conmection mmodify 网卡 ipv4.method manual 设置静态 nmcli conmection modify 网卡 ipv4.gatway 网关 设置网关 方法三 图像界面 nmtui 配置主机名字 [root@server01 ~]# hostnamectl set-hostname mv 设置名字 [root@server01 ~]# bash 刷新名字 [root@mv ~]# 配置域名 [root@Server01 ~]# vi /etc/hosts 修改hosts 172.16.100.201 Server01.sdskills.com <p></p></div></div></div> <div class="panel panel-default collapse-panel box-shadow-wrap-lg"><div class="panel-heading panel-collapse" data-toggle="collapse" data-target="#collapse-0cb9b9dccfa2dc4b901582d33e4bdd0031" aria-expanded="true"><div class="accordion-toggle"><span style="">Uos</span> <i class="pull-right fontello icon-fw fontello-angle-right"></i> </div> </div> <div class="panel-body collapse-panel-body"> <div id="collapse-0cb9b9dccfa2dc4b901582d33e4bdd0031" class="collapse collapse-content"><p></p> **一、修改配置文件并重启** > 第一种:(多网卡可能有问题) > > 进入网络配置文件,添加ip地址及网关信息 > > root@skills-PC:~# vim /etc/network/interfaces > > auto ens33 > iface ens33 inet static > address 172.16.100.201/25 > gateway 172.16.100.254 > > 保存重启网卡 > > root@skills-PC:~# systemctl restart network-manager.service > > root@skills-PC:~# systemctl restart networking.service > 第二种: > > 网络文件在 /etc/NetworkManager/system-conmections/ > > root@skills-PC:nmcli conmection add con-name ens33 type ethernet ifname ens33 > > root@skills-PC:# nmcli conncetion up ens33 > > root@skills-PC:nmcli connection modify ens33 ipv4.addresses 172.16.100.201/25 > > root@skills-PC:# nmcli connection modify ens33 ipv4.gateway 172.16.100.254 查看是否配置成功 root@skills-PC:~# ip a **二、配置主机域名** 完整域名 root@skills-PC:~# hostnamectl set-hostname Server01 root@skills-PC:~# bash 修改hosts root@Server01:~# vi /etc/hosts 172.16.100.201 Rserver.skills.cn Server01 测试 root@Server01:~# hostname Server01 root@Server01:~# hostname -f Server01.skills.cn <p></p></div></div></div> **2.DISK(RAID5)** • 在虚拟机上添加4 个1G 的硬盘; • 创建raid5,其中一个作为热备盘, 设备名为md0; • 将md0 设置为LVM,设备为/dev/vg01/lv01; • 格式化为ext4 文件系统; • 开机自动挂载到/data 目录。 <div class="panel panel-default collapse-panel box-shadow-wrap-lg"><div class="panel-heading panel-collapse" data-toggle="collapse" data-target="#collapse-aa2689f3bf541a171ebd1e3cc2da63ce15" aria-expanded="true"><div class="accordion-toggle"><span style="">Centos</span> <i class="pull-right fontello icon-fw fontello-angle-right"></i> </div> </div> <div class="panel-body collapse-panel-body"> <div id="collapse-aa2689f3bf541a171ebd1e3cc2da63ce15" class="collapse collapse-content"><p></p> Yum install mdadm -y [root@Server01 ~]# mdadm -C -n 3 -l 5 -a yes -x 1 /dev/md0 /dev/sd{b,c,d,e} mdadm: Defaulting to version 1.2 metadata mdadm: array /dev/md0 started. 创建卷组vg [root@Server01 ~]# vgcreate vg01 /dev/md0 Physical volume "/dev/md0" successfully created. Volume group "vg01" successfully created [root@Server01 ~]# 创建逻辑卷组lv [root@Server01 ~]# lvcreate -l 100%FREE -n lv01 vg01 Logical volume "lv01" created. [root@Server01 ~]# 逻辑卷格式化 [root@Server01 ~]# mkfs.ext4 /dev/vg01/lv01 mke2fs 1.42.9 (28-Dec-2013) Filesystem label= OS type: Linux Block size=4096 (log=2) Fragment size=4096 (log=2) Stride=128 blocks, Stripe width=256 blocks 130560 inodes, 522240 blocks 26112 blocks (5.00%) reserved for the super user First data block=0 Maximum filesystem blocks=534773760 16 block groups 32768 blocks per group, 32768 fragments per group 8160 inodes per group Superblock backups stored on blocks: 32768, 98304, 163840, 229376, 294912 Allocating group tables: done Writing inode tables: done Creating journal (8192 blocks): done Writing superblocks and filesystem accounting information: done [root@Server01 ~]# **挂载** [root@Server01 ~]# mkdir /data 添加到fstab [root@Server01 ~]# echo /dev/vg01/lv01 /data/ ext4 defaults 0 0 >> /etc/fstab 将/etc/fstab的所有内容重新加载 [root@Server01 ~]# mount –a 查看是否挂载成功 [root@Server01 ~]# df -Th /dev/mapper/vg01-lv01 ext4 2.0G 6.0M 1.9G 1% /dat <p></p></div></div></div> <div class="panel panel-default collapse-panel box-shadow-wrap-lg"><div class="panel-heading panel-collapse" data-toggle="collapse" data-target="#collapse-c4722e095eb046f18b80449acc4898ec53" aria-expanded="true"><div class="accordion-toggle"><span style="">Uos</span> <i class="pull-right fontello icon-fw fontello-angle-right"></i> </div> </div> <div class="panel-body collapse-panel-body"> <div id="collapse-c4722e095eb046f18b80449acc4898ec53" class="collapse collapse-content"><p></p> **一** **、安装mdadm、lvm** root@Server01:~# apt-get install mdadm lvm2 -y **二、添加磁盘**  添加好之后可能查看不到磁盘,这时候需要重启下虚拟机 root@Server01:~# reboot 查看磁盘 root@Server01:~# ls /dev/sd* **三、创建RAID5** root@Server01:~# mdadm -C -n 3 -l 5 -a yes -x 1 /dev/md0 /dev/sd{b,c,d,e} mdadm: Defaulting to version 1.2 metadata mdadm: array /dev/md0 started. **四、创建LVM** 创建卷组vg root@Server01:~# vgcreate vg01 /dev/md0 Physical volume "/dev/md0" successfully created. Volume group "vg01" successfully created 创建逻辑卷组lv root@Server01:~# lvcreate -l 100%FREE -n lv01 vg01 Logical volume "lv01" created. 逻辑卷格式化 root@Server01:~# mkfs.ext4 /dev/vg01/lv01 Allocating group tables: done Writing inode tables: done Creating journal (8192 blocks): done **六、开机自动挂载** root@Server01:~# mkdir /data root@Server01:~# mount /dev/vg01/lv01 /data/ 添加到fstab root@Server01:~# echo /dev/vg01/lv01 /data/ ext4 defaults 0 0 >> /etc/fstab 将/etc/fstab的所有内容重新加载 root@Server01:~# mount –a 查看是否挂载成功 root@Server01:~# df -Th /dev/mapper/vg01-lv01 ext4 2.0G 6.0M 1.9G 1% /data <p></p></div></div></div> **3.NFS** • 共享/data/share目录; • 用于存储server01主机的web数据; • 仅允许service01主机访问该共享。 <div class="panel panel-default collapse-panel box-shadow-wrap-lg"><div class="panel-heading panel-collapse" data-toggle="collapse" data-target="#collapse-79cf589ebd2cf0d4aa5e4212a4c34e3f31" aria-expanded="true"><div class="accordion-toggle"><span style="">Centos</span> <i class="pull-right fontello icon-fw fontello-angle-right"></i> </div> </div> <div class="panel-body collapse-panel-body"> <div id="collapse-79cf589ebd2cf0d4aa5e4212a4c34e3f31" class="collapse collapse-content"><p></p> [root@Server01 ~]# yum install nfs-utils –y 创建 [root@Server01 ~]# mkdir /data/share –p 赋权 [root@Server01 ~]# chmod 755 /data/share/ 修改配置文件 [root@Server01 ~]# vim /etc/exports /data/share 192.168.10.4(rw,sync,no_root_squash,no_all_squash) #192.168.10.4为Server01主机ip地址 一定要按顺序启动 [root@Server01 ~]# systemctl start rpcbind [root@Server01 ~]# systemctl start nfs 测试是否配置成功 [root@Server01 ~]# showmount -e localhost Export list for localhost: /data/share 192.168.10.4 客户端挂载 [root@Server01 ~]# mkdir /guazai [root@Server01 ~]# mount -t nfs 192.168.10.4:/data/share /guazai/ [root@Server01 ~]# df -Th 192.168.10.4:/data/share nfs4 2.0G 6.0M 1.9G 1% /guazai <p></p></div></div></div> <div class="panel panel-default collapse-panel box-shadow-wrap-lg"><div class="panel-heading panel-collapse" data-toggle="collapse" data-target="#collapse-a48bcce2b595c70335aac91636d102d133" aria-expanded="true"><div class="accordion-toggle"><span style="">Uos</span> <i class="pull-right fontello icon-fw fontello-angle-right"></i> </div> </div> <div class="panel-body collapse-panel-body"> <div id="collapse-a48bcce2b595c70335aac91636d102d133" class="collapse collapse-content"><p></p> **一、安装nfs** root@Server01:~# apt install nfs-kernel-server # 安装服务 **二、配置共享目录** root@Server01:~# mkdir /data/share –p root@Server01:~# chmod 755 /data/share/ root@Server01:~# vim /etc/exports #修改共享文件目录 /data/share 172.16.100.201(rw,sync,no_root_squash,no_all_squash) **三、启动服务、测试** root@Server01:~# systemctl start rpcbind root@Server01:~# systemctl start nfs root@Server01:~# showmount -e localhost #测试是否配置成功 客户端挂载 root@Server01:~# mkdir /guazai root@Server01:~# mount -t nfs 192.168.10.4:/data/share /guazai/ root@Server01:~# df -Th 192.168.10.4:/data/share nfs4 2.0G 6.0M 1.9G 1% /guazai <p></p></div></div></div> **4.DNS** · 安装DNS服务相关软件包; · 建立sdskills.com域,为所有除Internet区域的主机或服务器建立正\反的域名解析; · 当出现无法解析的域名时,向域skills.com申请更高层次的解析。 <div class="panel panel-default collapse-panel box-shadow-wrap-lg"><div class="panel-heading panel-collapse" data-toggle="collapse" data-target="#collapse-2e697255c899a9161843e5abc7372f8495" aria-expanded="true"><div class="accordion-toggle"><span style="">Centos</span> <i class="pull-right fontello icon-fw fontello-angle-right"></i> </div> </div> <div class="panel-body collapse-panel-body"> <div id="collapse-2e697255c899a9161843e5abc7372f8495" class="collapse collapse-content"><p></p> [root@Server01 ~]# yum install bind –y [root@Server01 ~]# vim /etc/named.conf 把13行和21行修改为any listen-on port 53 { any; }; allow-query { any; }; 设置转发 forwarders { 192.168.10.4;}; 注释掉这三行代码 ``` # recursion yes; # dnssec-enable yes; # dnssec-validation yes; ``` ``` 在末尾添加正反向解析区域 zone "sdskills.com" IN { type master; file "sdskills.com.zone"; }; zone "100.16.172.in-addr.arpa" IN { type slave; file "172.16.100.zone"; }; ``` 保存退出,切换目录 [root@Server04 ~]# cd /var/named/ 复制模板 [root@Server04 named]# cp named.loopback sdskills.com.zone [root@Server04 named]# cp named.loopback 172.16.100.zone 修改文件 ``` 正向区域 [root@Server04 named]# vim sdskills.com.zone $TTL 1D @ IN SOA @ rname.invalid. ( 0 ; serial 1D ; refresh 1H ; retry 1W ; expire 3H ) ; minimum @ IN NS www.sdskills.com. @ IN MX 10 mail www IN A 172.16.100.201 ftp IN A 172.16.100.202 mail IN A 172.16.100.202 反向区域 [root@Server04 named]# vim 172.16.100.zone $TTL 1D @ IN SOA @ rname.invalid. ( 0 ; serial 1D ; refresh 1H ; retry 1W ; expire 3H ) ; minimum @ NS www.sdskills.com. 201 IN PTR www.sdskills.com. 202 IN PTR ftp.sdskills.com. 202 IN PTR mail.sdskills.com. ``` 给文件赋权 [root@Server04 named]# chmod 777 sdskills.com.zone 172.16.100.zone 重启服务 [root@Server04 named]# systemctl restart named 客户端 修改DNS地址 [root@Client ~]# vim /etc/resolv.conf 设置DNS地址 nameserver 172.16.100.201 安装DNS工具 [root@Client ~]# yum install bind-utils –y 解析 [root@Client ~]# nslookup www.sdskills.com <p></p></div></div></div> <div class="panel panel-default collapse-panel box-shadow-wrap-lg"><div class="panel-heading panel-collapse" data-toggle="collapse" data-target="#collapse-e8ec77edbf175bf2c07bcc5b1a5e30e769" aria-expanded="true"><div class="accordion-toggle"><span style="">Uos</span> <i class="pull-right fontello icon-fw fontello-angle-right"></i> </div> </div> <div class="panel-body collapse-panel-body"> <div id="collapse-e8ec77edbf175bf2c07bcc5b1a5e30e769" class="collapse collapse-content"><p></p> **一、安装DNS服务** root@Server01:~# apt install -y bind9 **三、修改配置文件,设置正反向解析区域** root@Server01:~# vim /etc/named.conf 把13行和21行修改为any listen-on port 53 { any; }; allow-query { any; }; 设置转发 forwarders { 192.168.10.4;}; 注释掉这三行代码 ``` # recursion yes; # dnssec-enable yes; # dnssec-validation yes; ``` 在末尾添加正反向解析区域 ``` zone "sdskills.com" IN { type master; file "sdskills.com.zone"; }; zone "100.16.172.in-addr.arpa" IN { type master; file "172.16.100.zone"; }; ``` 保存退出,切换目录 root@Server01:~# cd /var/named/ 复制模板 root@Server01:/var/named# cp named.loopback sdskills.com.zone root@Server01:/var/named# cp named.loopback 172.16.100.zone 修改文件 正向区域 root@Server01:/var/named# vim sdskills.com.zone ``` $TTL 1D @ IN SOA @ rname.invalid. ( 0 ; serial 1D ; refresh 1H ; retry 1W ; expire 3H ) ; minimum @ IN NS www.sdskills.com. @ IN MX 10 mail www IN A 172.16.100.201 ftp IN A 172.16.100.202 mail IN A 172.16.100.202 smtp IN A 172.16.100.202 imap IN A 172.16.100.202 ``` 反向区域 root@Server01:/var/named# vim 172.16.100.zone ``` $TTL 1D @ IN SOA @ rname.invalid. ( 0 ; serial 1D ; refresh 1H ; retry 1W ; expire 3H ) ; minimum @ NS www.sdskills.com. 201 IN PTR www.sdskills.com. 202 IN PTR ftp.sdskills.com. 202 IN PTR mail.sdskills.com. 202 IN PTR smtp.sdskills.com. 202 IN PTR imap.sdskills.com. ``` 给文件赋权 root@Server01:/var/named# chmod 777 sdskills.com.zone 172.16.100.zone 重启服务 root@Server01:/var/named# systemctl restart named <p></p></div></div></div> **5.Webserver** • 安装web服务相关软件包; • 由Server01提供www.sdskills.com • skills公司的门户网站; • 使用apache服务; • 网页文件放在/data/share/htdocs/skills; • 服务以用户webuser运行; • 首页内容为“This is the front page of sdskills's website.”; • /htdocs/skills/staff.html内容为“Staff Information”; • 该页面需要员工的账号认证才能访问; • 员工账号存储在ldap中,账号为zsuser、lsus • 网站使用https协议; • SSL使用RServer颁发的证书, 颁发给: C = CN ST = China L = ShangDong O = skills OU = Operations Departments CN = *.skills.com • Sever01的CA证书路径:/CA/cacert.pem • 签发数字证书,颁发者: C = CN; O = Inc OU = www.skills.com CN = skill Global Root CA • 客户端访问https时应无浏览器(含终端)安全警告信息; • 当用户使用http访问时自动跳转到https安全连接; • 当用户使用sdskills.com或any.sdskills.com(any代表任意网址前缀)访问时,自动跳转到www.sdskills.com。 <div class="panel panel-default collapse-panel box-shadow-wrap-lg"><div class="panel-heading panel-collapse" data-toggle="collapse" data-target="#collapse-7f7db86e560e611ad948cae6adb52e0b63" aria-expanded="true"><div class="accordion-toggle"><span style="">Uos</span> <i class="pull-right fontello icon-fw fontello-angle-right"></i> </div> </div> <div class="panel-body collapse-panel-body"> <div id="collapse-7f7db86e560e611ad948cae6adb52e0b63" class="collapse collapse-content"><p></p> **一、安装httpd、ssl模块** root@Server01:~# apt install apache6 -y **二、增加用户并修改** root@Server01:~# useradd -r webuser root@Server01:~# vim /etc/httpd/conf/httpd.conf User webuser Group webuser **三、创建证书并申请** 这只是其中方法之一,还可以将证书给CA根证书机构(Rserver)去签发 创建根证书 root@Server01:~# vim /etc/pki/tls/openssl.cnf dir = /CA root@Server01:~# mkdir /CA root@Server01:~# cp -rf /etc/pki/tls/* /CA root@Server01:~# cd /CA/ root@Server01:~# touch index.txt root@Server01:~# echo 01 >serial root@Server01:~# openssl genrsa -out private/cakey.pem 2048 ``` Generating RSA private key, 2048 bit long modulus .+++ .................................................................................................................+++ e is 65537 (0x10001) root@Server04:/CA# openssl req -new -x509 -key ./private/cakey.pem -out cacert.pem You are about to be asked to enter information that will be incorporated into your certificate request. What you are about to enter is what is called a Distinguished Name or a DN. There are quite a few fields but you can leave some blank For some fields there will be a default value, If you enter '.', the field will be left blank. ----- Country Name (2 letter code) [AU]:CN State or Province Name (full name) [Some-State]: Locality Name (eg, city) []: Organization Name (eg, company) [Internet Widgits Pty Ltd]:Inc Organizational Unit Name (eg, section) []:www.skills.com Common Name (e.g. server FQDN or YOUR name) []:skill Global Root CA Email Address []: ``` 申请网络证书秘钥和请求证书 [root@Server01 CA]# openssl genrsa -out httpd.key 2048 ``` Generating RSA private key, 2048 bit long modulus ..............................................................+++ ................................................................+++ e is 65537 (0x10001) [root@Server01 CA]# openssl req -new -key httpd.key -out httpd.csr You are about to be asked to enter information that will be incorporated into your certificate request. What you are about to enter is what is called a Distinguished Name or a DN. There are quite a few fields but you can leave some blank For some fields there will be a default value, If you enter '.', the field will be left blank. ----- Country Name (2 letter code) [XX]:CN State or Province Name (full name) []:China Locality Name (eg, city) [Default City]:ShangDong Organization Name (eg, company) [Default Company Ltd]:skills Organizational Unit Name (eg, section) []:Operations Departments Common Name (eg, your name or your server's hostname) []:*.sdskills.com Email Address []: Please enter the following 'extra' attributes to be sent with your certificate request A challenge password []: An optional company name []: ``` 给证书签名 root@Server01:/CA/# openssl x509 -req -in httpd.csr -CA /CA/cacert.pem -CAkey /CA/private/cakey.pem -CAcreateserial -out httpd.crt ``` Signature ok ``` **五、创建apache目录和内容** root@Server01:/CA/# mkdir /data/share/htdocs/skills -p root@Server01:/CA/# echo "This is the front page of sdskills's website." >> /data/share/htdocs/skills/index.html root@Server01:/CA/# echo "Staff Information" >> /data/share/htdocs/skills/staff.html **六、修改配置文件及重定向应用** root@Server01:/CA/# vim /etc/httpd/conf/httpd.conf 最后一行插入 ``` IncludeOptional conf.d/*.conf <VirtualHost *:80> Redirect permanent / https://www.sdskills.com/ </VirtualHost> <VirtualHost *:443> Redirect permanent / https://www.sdskills.com/ SSLEngine ON SSLCertificateFile /CA/httpd.crt SSLCertificateKeyFile /CA/httpd.key </VirtualHost> <VirtualHost *:443> ServerName www.sdskills.com DocumentRoot /data/share/htdocs/skills SSLEngine ON SSLCertificateFile /CA/httpd.crt SSLCertificateKeyFile /CA/httpd.key <Directory /data/share/htdocs/skills> Require all granted </Directory> <Directory /data/share/htdocs/skills/staff.html> AuthType Basic AuthName "login" AuthUserFile "/var/passwd" Require valid-user </Directory> </VirtualHost> ``` 修改CA证书路径 root@Server01:~# vim /etc/httpd/conf.modules.d/ssl.conf ``` <VirtualHost *:443> SSLCertificateFile /CA/httpd.crt SSLCertificateKeyFile /CA/httpd.key ``` 创建认证用户 root@Server01:/CA/# htpasswd -c /var/passwd zsuser New password: Re-type new password: Adding password for user zsuser <p></p></div></div></div> **6.SSH** • 安装SSH • 仅允许client客户端进行ssh访问,其余所有主机的请求都应该拒绝; • 配置client只能在Chinaskill22用户环境下可以免秘钥登录,端口号为3033,并且拥有root控制权限; <div class="panel panel-default collapse-panel box-shadow-wrap-lg"><div class="panel-heading panel-collapse" data-toggle="collapse" data-target="#collapse-0c1de20e919ef43264da6f31bab945c850" aria-expanded="true"><div class="accordion-toggle"><span style="">Uos</span> <i class="pull-right fontello icon-fw fontello-angle-right"></i> </div> </div> <div class="panel-body collapse-panel-body"> <div id="collapse-0c1de20e919ef43264da6f31bab945c850" class="collapse collapse-content"><p></p> **一、安装ssh服务** root@Server01:~# apt install openssh-server **二、编辑ssh配置文件设置端口** root@Server01:~# vim /etc/ssh/sshd_config port 2233 **三、重启ssh服务** root@Server01:~# systemctl restart ssh **四** **、设置规则** root@Server01:~# vim /etc/hosts.allow 只允许Client这个IP登录 sshd:10.10.100.1:allow 拒接所有 root@Server01:~# vim /etc/hosts.deny sshd:ALL **五** **、创建用户并设置免密登录** Client: 创建用户 [root@client ~]# useradd Chinaskill22 切换到Chinaskill22用户下 [root@client ~]# su Chinaskill22 生成密钥 [Chinaskill22@client root]$ ssh-keygen 复制密钥到服务器 [Chinaskill22@client root]$ ssh-copy-id root@ip地址 -p 2233 <p></p></div></div></div> **7.DBMS** • 在Server01上完成MariaDB数据库的安装,添加数据库root用户密码为Chinaskill22! • 安装MariaDB 数据库服务器组件; • MariaDB数据库管理员信息:User: root/ Password: Chinaskill20!; • 安装MariaDB WEB 管理面板 “phpMyAdmin”,通过apache 进行发布 • 安装phpMyAdmin ,MariaDB 的web管理面板组件; • 安装apache,配置php环境,用于发布phpMyAdmin; <div class="panel panel-default collapse-panel box-shadow-wrap-lg"><div class="panel-heading panel-collapse" data-toggle="collapse" data-target="#collapse-7c819acc4b40cfd7018b678c653aaf8e29" aria-expanded="true"><div class="accordion-toggle"><span style="">Uos</span> <i class="pull-right fontello icon-fw fontello-angle-right"></i> </div> </div> <div class="panel-body collapse-panel-body"> <div id="collapse-7c819acc4b40cfd7018b678c653aaf8e29" class="collapse collapse-content"><p></p> root@Server01:~# apt -y install php mariadb-server.x86_64 php-mysql php-mbstring.x86_64 //安装环境 root@Server01:~# apt -y install lrzsz.x86_64 //安装上传程序 //将phpmyadmin安装包上传 root@Server01:~# mv /etc/phpMyAdmin-4.4.15.10-all-languages.tar.gz /data/share/htdocs/skills/ //移动到站点目录 root@Server01:~# cd /data/share/htdocs/skills/ //进入站点目录 root@Server01:~# tar -zxvf phpMyAdmin-4.4.15.10-all-languages.tar.gz //解压 root@Server01:~# mv phpMyAdmin-4.4.15.10-all-languages phpmyadmin //修改目录名称 root@Server01:~# systemctl restart mariadb.service //开启数据库 root@Server01:~# mysql_secure_installation //数据库初始化 > //请输入当前root用户的密码,如果没有直接按回车,此root并非linux的root用户是mysql 的 > > //是否设置root密码? > > //是否移除匿名用户?选择移除 > > //禁止远程root登录?选择否 > > //是否移除测试数据库?(建议先不移除) > > //是否重新加载权限表?选择y 因为刚刚更改了密码(当我们更改了mysql用户相关的信息之后建议去重载权限 root@Server01:~# systemctl restart mariadb.service //重启数据库 root@Server01:~# systemctl restart httpd.service //重启apache服务 //访问 www.sdskills.org/phpadmin/ 警告会话权限不足 root@Server01:~# vim /var/log/httpd/error_log //查看http错误日志,没有发现问题 root@Server01:~# chmod -R 777 /var/lib/php/session/ //给php会话权限 //访问的时候输入数据库账号密码就可以登陆 <p></p></div></div></div> **8.SDN服务** • 安装opendaylight、mininet、Ovs软件平台。。 • 启动OpenDayLight的karaf程序,安装如下组件:odl-restconf、odl-l2switch-switch-ui、odl-mdsal-apidocs、odl-dluxapps-applications。 • 使用Mininet和OpenVswitch构建拓扑,连接ODL的6653端口如下拓扑结构:  • 在浏览器上可以访问ODL管理页面查看网元拓扑结构。 • 通过OVS手工下发流表,H1可以ping通H3,H1、H3无法ping通H2。 H1启动HTTP-Server功能,WEB端口为8080,H3作为HTTP-Client,获取H1的html网页配置文件。 <div class="panel panel-default collapse-panel box-shadow-wrap-lg"><div class="panel-heading panel-collapse" data-toggle="collapse" data-target="#collapse-73546eb5eb1b665d5abb11778719cd0e88" aria-expanded="true"><div class="accordion-toggle"><span style="">Uos</span> <i class="pull-right fontello icon-fw fontello-angle-right"></i> </div> </div> <div class="panel-body collapse-panel-body"> <div id="collapse-73546eb5eb1b665d5abb11778719cd0e88" class="collapse collapse-content"><p></p> **一、上传并安装好需要的安装包** 使用WinSCP上传  安装好JDK及SDN需要的插件 root@Server01:~# apt install unzip telnet java-1.8.0-openjdk net-tools –y 安装上传好的Opendaylight、Mininet、Ovs以及Python插件包 root@Server01:~# ls ``` anaconda-ks.cfg distribution-karaf-0.6.0-Carbon.zip mininet-2.2.2-2.el7.x86_64.rpm openvswitch-2.5.0-2.el7.x86_64.rpm python-networkx-1.8.1-12.el7.noarch.rpm python-networkx-core-1.8.1-12.el7.noarch.rpm ``` root@Server01:~# apt install mininet-2.2.2-2.el7.x86_64.rpm openvswitch-2.5.0-2.el7.x86_64.rpm python-networkx-1.8.1-12.el7.noarch.rpm python-networkx-core-1.8.1-12.el7.noarch.rpm –y 启动OVS root@Server01:~# systemctl start openvswitch **二、解压Opendaylight并启动Karaf程序** root@Server01:~# unzip distribution-karaf-0.6.0-Carbon.zip root@Server01:~# cd distribution-karaf-0.6.0-Carbon/bin/ root@Server01:/distribution-karaf-0.6.0-Carbon/bin/# ./start root@Server01:/distribution-karaf-0.6.0-Carbon/bin/# ./client ##这里需要等待一下在输入 **三、安装组件** opendaylight-user@root>feature:install odl-restconf odl-l2switch-switch-ui odl-mdsal-apidocs odl-dluxapps-applications 安装完后打开页面测试一下 [http://ip:8181/index.html#login](http://ip:8181/index.html#login) 用户名和密码都是admin  **四、创建拓扑** opendaylight-user@root>logout root@Server01:/distribution-karaf-0.6.0-Carbon/bin/# mn --controller=remote,ip=127.0.0.1,port=6653 --topo=tree,1,3 mininet> pingall *** Ping: testing ping reachability h1 -> h2 h3 h2 -> h1 h3 h3 -> h1 h2 *** Results: 0% dropped (6/6 received) mininet> 打开网页查看拓扑(注:一定要ping通再去查看)  **五、下发流表** mininet> dpctl add-flow in_port=1,actions=output:3 *** s1 ------------------------------------------------------------------------ mininet> dpctl add-flow in_port=3,actions=output:1 *** s1 ------------------------------------------------------------------------ mininet> pingall *** Ping: testing ping reachability h1 -> X h3 h2 -> X X h3 -> h1 X *** Results: 66% dropped (2/6 received) mininet> **六、启动HTTP-Server功能** mininet> h1 python -m SimpleHTTPServer 8080 & mininet> sh apt install wget -y mininet> h3 wget 10.0.0.1:8080 --2022-07-20 12:52:56-- http://10.0.0.1:8080/ Connecting to 10.0.0.1:8080... connected. HTTP request sent, awaiting response... 200 OK Length: 1052 (1.0K) [text/html] Saving to: ‘index.html’ index.html 100%[===================>] 1.03K --.-KB/s in 0s 2022-07-20 12:52:56 (123 MB/s) - ‘index.html’ saved [1052/1052] mininet> <p></p></div></div></div> ### ***SERVER02 TASK*** **1.NETWORK** • 请根据基本配置信息配置服务器的主机名,网卡IP地址配置、域名服务器、网关等。 <div class="panel panel-default collapse-panel box-shadow-wrap-lg"><div class="panel-heading panel-collapse" data-toggle="collapse" data-target="#collapse-d87ae8ba24ffe73f21130b0d77215a9511" aria-expanded="true"><div class="accordion-toggle"><span style="">Uos</span> <i class="pull-right fontello icon-fw fontello-angle-right"></i> </div> </div> <div class="panel-body collapse-panel-body"> <div id="collapse-d87ae8ba24ffe73f21130b0d77215a9511" class="collapse collapse-content"><p></p> **一、修改配置文件并重启** > 第一种:(多网卡可能有问题) > > 进入网络配置文件,添加ip地址及网关信息 > > root@skills-PC:~# vim /etc/network/interfaces > > auto ens33 > iface ens33 inet static > address 172.16.100.202/25 > gateway 172.16.100.128 > > 保存重启网卡 > > root@skills-PC:~# systemctl restart network-manager.service > > root@skills-PC:~# systemctl restart networking.service > 第二种: > > 网络文件在 /etc/NetworkManager/system-conmections/ > > root@skills-PC:nmcli conmection add con-name ens33 type ethernet ifname ens33 > > root@skills-PC:# nmcli conncetion up ens33 > > root@skills-PC:nmcli connection modify ens33 ipv4.addresses 172.16.100.202/25 > > root@skills-PC:# nmcli connection modify ens33 ipv4.gateway 172.16.100.128 查看是否配置成功 root@skills-PC:~# ip a **二、配置主机域名** 完整域名 root@skills-PC:~# hostnamectl set-hostname Server01 root@skills-PC:~# bash 修改hosts root@Server01:~# vi /etc/hosts 172.16.100.202 Rserver.skills.cn Server01 测试 root@Server02:~# hostname Server02 root@Server02:~# hostname -f Server02.skills.cn <p></p></div></div></div> **2.Ftp** • 禁止使用不安全的FTP,请使用“CSK Global Root CA”证书颁发机构,颁发的证书,启用FTPS服务; • 用户webadmin,登录ftp服务器,根目录为/webdata/; • 登录后限制在自己的根目录; • 允许WEB管理员上传和下载文件,但是禁止上传后缀名为.doc .docx .xlsx的文件。 • 限制用户的下载最大速度为100kb/s;最大同一IP在线人数为2人; • 用于通过工具或者浏览器下载的最大速度不超过 100kb/s • 一个IP地址同时登陆的用户进程/人数不超过2人。 <div class="panel panel-default collapse-panel box-shadow-wrap-lg"><div class="panel-heading panel-collapse" data-toggle="collapse" data-target="#collapse-43d8cf50eaa8a56ebbe942e7d0bb392330" aria-expanded="true"><div class="accordion-toggle"><span style="">Uos</span> <i class="pull-right fontello icon-fw fontello-angle-right"></i> </div> </div> <div class="panel-body collapse-panel-body"> <div id="collapse-43d8cf50eaa8a56ebbe942e7d0bb392330" class="collapse collapse-content"><p></p> **一、安装vsftpd** root@Server02:~#apt install vsftpd –y **三、创建用户与目录并申请证书** root@Server02:~# mkdir /webdata root@Server02:~# chmod 777 /webdata/ root@Server02:~# useradd webadmin root@Server02:~# passwd webadmin Changing password for user webadmin. New password: BAD PASSWORD: The password is shorter than 8 characters Retype new password: passwd: all authentication tokens updated successfully. 创建根证书 这是其中方法之一,还可将证书给CA根证书机构(Rserver)去签发 ``` root@Server02:~# vim /etc/pki/tls/openssl.cnf dir = /CA root@Server02:~# mkdir /CA root@Server02:~# cp -rf /etc/pki/tls/* /CA root@Server02:~# cd /CA/ root@Server02:~# touch index.txt root@Server02:~# echo 01 >serial root@Server02:~# openssl genrsa -out private/cakey.pem 2048 Generating RSA private key, 2048 bit long modulus .+++ .................................................................................................................+++ e is 65537 (0x10001) root@Server04:/CA# openssl req -new -x509 -key ./private/cakey.pem -out cacert.pem You are about to be asked to enter information that will be incorporated into your certificate request. What you are about to enter is what is called a Distinguished Name or a DN. There are quite a few fields but you can leave some blank For some fields there will be a default value, If you enter '.', the field will be left blank. ----- Country Name (2 letter code) [AU]:CN State or Province Name (full name) [Some-State]: Locality Name (eg, city) []: Organization Name (eg, company) [Internet Widgits Pty Ltd]:Inc Organizational Unit Name (eg, section) []:www.skills.com Common Name (e.g. server FQDN or YOUR name) []:skill Global Root CA Email Address []: 申请站点证书秘钥和请求证书 root@Server02:CA# openssl genrsa -out ftp.key 2048 Generating RSA private key, 2048 bit long modulus ..............................................................+++ ................................................................+++ e is 65537 (0x10001) root@Server02:CA# openssl req -new -key ftp.key -out ftp.csr You are about to be asked to enter information that will be incorporated into your certificate request. What you are about to enter is what is called a Distinguished Name or a DN. There are quite a few fields but you can leave some blank For some fields there will be a default value, If you enter '.', the field will be left blank. ----- Country Name (2 letter code) [XX]:CN State or Province Name (full name) []:China Locality Name (eg, city) [Default City]:ShangDong Organization Name (eg, company) [Default Company Ltd]:skills Organizational Unit Name (eg, section) []:Operations Departments Common Name (eg, your name or your server's hostname) []:ftp.sdskills.com Email Address []: Please enter the following 'extra' attributes to be sent with your certificate request A challenge password []: An optional company name []: 给证书签名 root@Server02:CA# openssl x509 -req -in ftp.csr -CA /CA/cacert.pem -CAkey /CA/private/cakey.pem -CAcreateserial -out ftp.crt Signature ok subject=/C=CN/ST=China/L=ShangDong/O=skills/OU=Operations Departments/CN=ftp.sdskills.com Getting CA Private Key ``` **三、编辑ftp配置文件** root@Server02:CA# vim /etc/vsftpd/vsftpd.conf ``` chroot_local_user=YES force_local_data_ssl=YES force_local_logins_ssl=YES ssl_enable=YES rsa_cert_file=/CA/ftp.crt rsa_private_key_file=/CA/ftp.key local_root=/webdata allow_writeable_chroot=YES deny_file={*.doc,*.docx,*.xlsx} local_max_rate=100000 max_per_ip=2 ``` <p></p></div></div></div> **3.MAIL** • Postfix • sdskill.com 的邮件发送服务器 • 支持smtps(465)协议连接,使用Rserver颁发的证书,证书路径/CA/cacert.pem • 创建邮箱账户“user1~user99”(共99个用户),密码为Chinaskill20!; · **Dovecot** • sdskill.com 的邮件接收服务器; • 支持imaps(993)协议连接,使用Rserver颁发的证书,证书路径/CA/cacert.pem; • 请保留至少两个用户已成功登录并能正常收发邮件,以方便测试. <div class="panel panel-default collapse-panel box-shadow-wrap-lg"><div class="panel-heading panel-collapse" data-toggle="collapse" data-target="#collapse-0e666d40c817ea149175cbb69a55b29b0" aria-expanded="true"><div class="accordion-toggle"><span style="">Uos</span> <i class="pull-right fontello icon-fw fontello-angle-right"></i> </div> </div> <div class="panel-body collapse-panel-body"> <div id="collapse-0e666d40c817ea149175cbb69a55b29b0" class="collapse collapse-content"><p></p> **一、安装postfix** root@Server02:~#apt-get install postfix **二、申请证书** 这里使用自签名证书 **Postfix证书** root@Server02:~# mkdir /CA root@Server02:~# openssl genrsa -out /CA/postfix.key ``` Generating RSA private key, 2048 bit long modulus ....................+++ ..................+++ e is 65537 (0x10001) ``` root@Server02 ~# openssl req -x509 -new -key /CA/postfix.key -out /CA/postfix.crt ``` You are about to be asked to enter information that will be incorporated into your certificate request. What you are about to enter is what is called a Distinguished Name or a DN. There are quite a few fields but you can leave some blank For some fields there will be a default value, If you enter '.', the field will be left blank. ----- Country Name (2 letter code) [XX]:CN State or Province Name (full name) []:China Locality Name (eg, city) [Default City]:ShangDong Organization Name (eg, company) [Default Company Ltd]:skills Organizational Unit Name (eg, section) []:Operations Departments Common Name (eg, your name or your server's hostname) []:smtp.sdskills.com Email Address []: ``` **Dovecot证书** root@Server02 ~# openssl genrsa -out /CA/dovecot.key ``` Generating RSA private key, 2048 bit long modulus ...................................................+++ ..............+++ e is 65537 (0x10001) ``` root@Server02 ~# openssl req -x509 -new -key /CA/dovecot.key -out /CA/dovecot.crt ``` You are about to be asked to enter information that will be incorporated into your certificate request. What you are about to enter is what is called a Distinguished Name or a DN. There are quite a few fields but you can leave some blank For some fields there will be a default value, If you enter '.', the field will be left blank. ----- Country Name (2 letter code) [XX]:CN State or Province Name (full name) []:China Locality Name (eg, city) [Default City]:ShangDong Organization Name (eg, company) [Default Company Ltd]:Skills Organizational Unit Name (eg, section) []:imap.sdskills.com Common Name (eg, your name or your server's hostname) []: Email Address []: ``` **三、配置Postfix** root@Server02 ~# vim /etc/postfix/main.cf ``` :set nu //以数字显示行数 75行:myhostname = mail.sdskills.com //本机主机名,可以为 wjy.com 83行:mydomain = sdskills.com //服务器域名 99行:myorigin = $mydomain //初始域名 113行:inet_interfaces = all //网卡选择 115行: #inet_interfaces = localhost //注释115行 164行:mydestination = $myhostname, localhost.$mydomain, localhost, $mydomain //目标域 or 注释164行,取消注释165行 264行:mynetworks = 0.0.0.0/0 //以下网段可以通过 419行:home_mailbox = Maildir/ //邮件目录,在用户家目录下 670行:smtpd_use_tls = yes 671行:smtpd_tls_cert_file = /CA/postfix.crt 672行:smtpd_tls_key_file = /CA/postfix.key ``` 关闭普通端口开启465端口 root@Server02:~# vim /etc/postfix/master.cf ``` 11行:#smtp inet n - n - - smtpd ##注释掉25端口 16行:smtps inet n - n - - smtpd ##开启465端口 28行: -o smtpd_tls_wrappermode=yes ##取消注释,启动证书认证 ``` **四、配置Dovecot** root@Server02 ~# vim /etc/dovecot/dovecot.conf 24行:protocols = imaps ##启用 imaps root@Server02 ~# vim /etc/dovecot/conf.d/10-auth.conf 10行:disable_plaintext_auth = no root@Server02 ~# vim /etc/dovecot/conf.d/10-mail.conf 24行: mail_location = maildir:~/Maildir ##取消注释 root@Server02 ~# vim /etc/dovecot/conf.d/10-ssl.conf 14行:ssl_cert = </CA/dovecot.crt 15行:ssl_key = </CA/dovecot.key **五、创建99个用户** ``` [root@Server02 ~]# for i in $(seq 1 99);do useradd user$i;done [root@Server02 ~]# for i in $(seq 1 99);do echo "Chinaskill22"|passwd --stdin user$i;done ``` **六、重启服务** root@Server02 ~# systemctl restart postfix root@Server02 ~# systemctl restart dovecot <p></p></div></div></div> **5.SSH** • 安装SSH • 仅允许client客户端进行ssh访问,其余所有主机的请求都应该拒绝; • 配置client只能在Chinaskill22用户环境下可以免秘钥登录,端口号为4044,并且拥有root控制权限; <div class="panel panel-default collapse-panel box-shadow-wrap-lg"><div class="panel-heading panel-collapse" data-toggle="collapse" data-target="#collapse-f89e5d3c69c990a0f64a94177317fecb24" aria-expanded="true"><div class="accordion-toggle"><span style="">Uos</span> <i class="pull-right fontello icon-fw fontello-angle-right"></i> </div> </div> <div class="panel-body collapse-panel-body"> <div id="collapse-f89e5d3c69c990a0f64a94177317fecb24" class="collapse collapse-content"><p></p> **一、安装ssh服务** root@Server02:~# apt install openssh-server **二、编辑ssh配置文件设置端口** root@Server02:~# vim /etc/ssh/sshd_config port 4044 **三、重启ssh服务** root@Server02:~# systemctl restart ssh **四** **、设置规则** root@Server02:~# vim /etc/hosts.allow 只允许Client这个IP登录 sshd:10.10.100.1:allow 拒接所有 root@Server02:~# vim /etc/hosts.deny sshd:ALL <p></p></div></div></div> ### ***SERVER03 TASK*** **1.NETWORK** · 请根据基本配置信息配置服务器的主机名,网卡IP地址配置、域名服务器、网关等。 <div class="panel panel-default collapse-panel box-shadow-wrap-lg"><div class="panel-heading panel-collapse" data-toggle="collapse" data-target="#collapse-f3e095474bbda0e6bb1cf237f785c53696" aria-expanded="true"><div class="accordion-toggle"><span style="">Uos</span> <i class="pull-right fontello icon-fw fontello-angle-right"></i> </div> </div> <div class="panel-body collapse-panel-body"> <div id="collapse-f3e095474bbda0e6bb1cf237f785c53696" class="collapse collapse-content"><p></p> **一、修改配置文件并重启** > 第一种:(多网卡可能有问题) > > 进入网络配置文件,添加ip地址及网关信息 > > root@skills-PC:~# vim /etc/network/interfaces > > auto ens33 > iface ens33 inet static > address 172.16.100.201/25 > gateway 172.16.100.254 > > 保存重启网卡 > > root@skills-PC:~# systemctl restart network-manager.service > > root@skills-PC:~# systemctl restart networking.service > 第二种: > > 网络文件在 /etc/NetworkManager/system-conmections/ > > root@skills-PC:nmcli conmection add con-name ens33 type ethernet ifname ens33 > > root@skills-PC:# nmcli conncetion up ens33 > > root@skills-PC:nmcli connection modify ens33 ipv4.addresses 172.16.100.201/25 > > root@skills-PC:# nmcli connection modify ens33 ipv4.gateway 172.16.100.254 查看是否配置成功 root@skills-PC:~# ip a **二、配置主机域名** 完整域名 root@skills-PC:~# hostnamectl set-hostname Server01 root@skills-PC:~# bash 修改hosts root@Server01:~# vi /etc/hosts 172.16.100.201 Rserver.skills.cn Server01 测试 root@Server01:~# hostname Server01 root@Server01:~# hostname -f Server01.skills.cn <p></p></div></div></div> **2.chrony** · chrony为全网提供时间同步服务器; · Server01、Server02、Server04、Client和Rserver应定期与其校正时间; · 每隔1分钟自动校正一次时间。 <div class="panel panel-default collapse-panel box-shadow-wrap-lg"><div class="panel-heading panel-collapse" data-toggle="collapse" data-target="#collapse-30039f2c82f0edd0b2e12a2fdabcbf8577" aria-expanded="true"><div class="accordion-toggle"><span style="">Uos</span> <i class="pull-right fontello icon-fw fontello-angle-right"></i> </div> </div> <div class="panel-body collapse-panel-body"> <div id="collapse-30039f2c82f0edd0b2e12a2fdabcbf8577" class="collapse collapse-content"><p></p> **一、安装chrony** 配置好本地源再安装 root@Server04:~# apt-get install chrony –y **二、修改配置** 删除默认配置文件 root@Server04:~# rm /etc/chrony/chrony.conf 编辑配置文件 root@Server04:~# vim /etc/chrony/chrony.conf server 127.0.0.1 iburst allow all local stratum 10 **三、启动服务、测试** 重启chrony root@Server04:~# systemctl restart chrony 测试下是否配置成功 安装npdate 一定要在客户端测试 [root@Client ~]# apt-get install ntpdate -y [root@Client ~]# ntpdate 192.168.10.4 22 Jul 03:46:55 ntpdate[10459]: step time server 192.168.10.4 offset -1.144208 sec [root@Client ~]# Cron任务计划 编辑 [root@Client ~]# vim /etc/crontab */1 * * * * root /usr/sbin/ntpdate 192.168.10.4 <p></p></div></div></div> **3.SSH** · 安装SSH · 仅允许client客户端进行ssh访问,其余所有主机的请求都应该拒绝; · 配置client只能在Chinaskill20用户环境下可以免秘钥登录,端口号为2233,并且拥有root控制权限; <div class="panel panel-default collapse-panel box-shadow-wrap-lg"><div class="panel-heading panel-collapse" data-toggle="collapse" data-target="#collapse-358c0331b44c972d3d3fa069b54434886" aria-expanded="true"><div class="accordion-toggle"><span style="">Uos</span> <i class="pull-right fontello icon-fw fontello-angle-right"></i> </div> </div> <div class="panel-body collapse-panel-body"> <div id="collapse-358c0331b44c972d3d3fa069b54434886" class="collapse collapse-content"><p></p> **一、安装ssh服务** root@Server03:~# apt install openssh-server **二、编辑ssh配置文件设置端口** root@Server03:~# vim /etc/ssh/sshd_config port 2233 **三、重启ssh服务** root@Server03:~# systemctl restart ssh **四** **、设置规则** root@Server03:~# vim /etc/hosts.allow 只允许Client这个IP登录 sshd:10.10.100.1:allow 拒接所有 root@Server03:~# vim /etc/hosts.deny sshd:ALL **五** **、创建用户并设置免密登录** Client: 切换到Chinaskill22用户下 [root@client ~]# su Chinaskill22 生成密钥 [Chinaskill22@client root]$ ssh-keygen 复制密钥到服务器 [Chinaskill22@client root]$ ssh-copy-id root@ip地址 -p 2233 <p></p></div></div></div> ### ***SERVER04 TASK*** **1.NETWORK** · 请根据基本配置信息配置服务器的主机名,网卡IP地址配置、域名服务器、网关等。 <div class="panel panel-default collapse-panel box-shadow-wrap-lg"><div class="panel-heading panel-collapse" data-toggle="collapse" data-target="#collapse-fd16efdfe36a2c857c036562538e385514" aria-expanded="true"><div class="accordion-toggle"><span style="">Uos</span> <i class="pull-right fontello icon-fw fontello-angle-right"></i> </div> </div> <div class="panel-body collapse-panel-body"> <div id="collapse-fd16efdfe36a2c857c036562538e385514" class="collapse collapse-content"><p></p> **一、修改配置文件并重启** > 第一种:(多网卡可能有问题) > > 进入网络配置文件,添加ip地址及网关信息 > > root@skills-PC:~# vim /etc/network/interfaces > > auto ens33 > iface ens33 inet static > address 172.16.100.201/25 > gateway 172.16.100.254 > > 保存重启网卡 > > root@skills-PC:~# systemctl restart network-manager.service > > root@skills-PC:~# systemctl restart networking.service > 第二种: > > 网络文件在 /etc/NetworkManager/system-conmections/ > > root@skills-PC:nmcli conmection add con-name ens33 type ethernet ifname ens33 > > root@skills-PC:# nmcli conncetion up ens33 > > root@skills-PC:nmcli connection modify ens33 ipv4.addresses 172.16.100.201/25 > > root@skills-PC:# nmcli connection modify ens33 ipv4.gateway 172.16.100.254 查看是否配置成功 root@skills-PC:~# ip a **二、配置主机域名** 完整域名 root@skills-PC:~# hostnamectl set-hostname Server01 root@skills-PC:~# bash 修改hosts root@Server01:~# vi /etc/hosts 172.16.100.201 Rserver.skills.cn Server01 测试 root@Server01:~# hostname Server01 root@Server01:~# hostname -f Server01.skills.cn <p></p></div></div></div> **2.DNS** · 安装DNS相关服务软件包; · 为域skills.com提供必要的域名解析 · 当非skills.com域的解析时,统一解析到Rserver连接Internet网段的IP地址或Rserver.skills.com <div class="panel panel-default collapse-panel box-shadow-wrap-lg"><div class="panel-heading panel-collapse" data-toggle="collapse" data-target="#collapse-597592676b738e1debb5521af4668e7346" aria-expanded="true"><div class="accordion-toggle"><span style="">Uos</span> <i class="pull-right fontello icon-fw fontello-angle-right"></i> </div> </div> <div class="panel-body collapse-panel-body"> <div id="collapse-597592676b738e1debb5521af4668e7346" class="collapse collapse-content"><p></p> **一、安装DNS服务** root@Server01:~# apt -y install bind9 dnsutils root@Server01:~# cd /etc/bind/ > db.127 #反向区域数据库,用于将ip解析为对应的域名 > > db.local #正向区域数据库,用于将域名解析为对应的IP地址 > > named.conf.default-zones #默认区域 > > named.conf.local #用于定义解析域,也可以直接在named.conf中直接划定解析域 > > named.conf.options #配置文件,全局选项配置 > > named.conf #Bind的主配置文件,不包含DNS数据 **二、定义解析域** 先去vim named.conf.default-zones 复制最后一个zone 将复制的粘贴到最后 粘贴如下: ``` zone "255.in-addr.arpa" { type master; file "/etc/bind/db.255"; }; vim named.conf.loacl 修改为: zone "." { type master; file "/etc/bind/root.zone"; }; zone "skills.com" { type master; file "/etc/bind/skills.com.zone"; }; ``` root@Server01:/etc/bind# /etc/bind# cp -a db.local root.zone root@Server01:/etc/bind# /etc/bind# cp -a db.local skills.com.zone root@Server01:/etc/bind# /etc/bind# vim skills.com.zone ``` $TTL 604800 @ IN SOA localhost. root.localhost. ( 2 ; Serial 604800 ; Refresh 86400 ; Retry 2419200 ; Expire 604800 ) ; Negative Cache TTL ; @ IN NS www.skills.com. www IN A 192.168.10.4 ``` root@Server01:~# /etc/bind root@Server01:/etc/bind~# vim root.zone ``` $TTL 604800 @ IN SOA localhost. root.localhost. ( 2 ; Serial 604800 ; Refresh 86400 ; Retry 2419200 ; Expire 604800 ) ; Negative Cache TTL ; @ IN NS localhost. * IN A 192.168.10.2 ``` **三、重启服务测试** root@Server01:/etc/bind# systemctl restart bind9 设置好DNS地址 root@Server01:/etc/bind# vim /etc/resolv.conf nameserver 192.168.10.4 **解析** root@Server04:/etc/bind# nslookup www.skills.com Server: 192.168.10.4 Address: 192.168.10.4#53 Name: www.skills.com Address: 192.168.10.4 root@Server04:/etc/bind# nslookup any.any.any Server: 192.168.10.4 Address: 192.168.10.4#53 Name: any.any.any Address: 192.168.10.2 root@Server04:/etc/bind# <p></p></div></div></div> **3.Webserver** · 提供www.skills.com · skills公司的门户网站; · 使用apache服务; · 网页文件放在/htdocs/skills; · 服务以用户webuser运行; · 首页内容为“This is the front page of skills's website.”; · /htdocs/sdskills/staff.html内容为“Staff Information”; · 该页面需要员工的账号认证才能访问; · 员工账号存储在ldap中,账号为zsuser、lsus · 网站使用https协议; · SSL使用RServer颁发的证书, 颁发给: C = CN ST = China L = ShangDong O = skills OU = Operations Departments CN = *.skills.cn · Rserver的CA证书路径:/CA/cacert.pem · 签发数字证书,颁发者: C = CN; O = Inc OU = www.skills.com CN = skill Global Root CA · 客户端访问https时应无浏览器(含终端)安全警告信息; · 当用户使用http访问时自动跳转到https安全连接; · 当用户使用skills.cn或any.skills.cn(any代表任意网址前缀)访问时,自动跳转到www.skills.com <div class="panel panel-default collapse-panel box-shadow-wrap-lg"><div class="panel-heading panel-collapse" data-toggle="collapse" data-target="#collapse-ba8d7a11ea1053f8d1f36425143a4dd198" aria-expanded="true"><div class="accordion-toggle"><span style="">Uos</span> <i class="pull-right fontello icon-fw fontello-angle-right"></i> </div> </div> <div class="panel-body collapse-panel-body"> <div id="collapse-ba8d7a11ea1053f8d1f36425143a4dd198" class="collapse collapse-content"><p></p> **一** **、安装apache服务** root@Server04:~# apt install apache2 -y **二、增加用户并修改** root@Server04:~# useradd -r webuser root@Server04:~# vim /etc/apache2/apache2.conf User webuser Group webuser **三、创建证书并申请** 这是其中方法之一,还可将证书给CA根证书机构(Rserver)去做签发 root@Server04:~# vim /etc/ssl/openssl.cnf dir = /CA root@Server04:~# mkdir /CA root@Server04:~# cp -rf /etc/ssl/* /CA root@Server04:~# touch index.txt root@Server04:~# echo 01 >serial root@Server04:~# cd /CA root@Server04:/CA# openssl genrsa -out private/cakey.pem 2048 ``` Generating RSA private key, 2048 bit long modulus (2 primes) ...............+++++ .................................+++++ e is 65537 (0x010001) root@Server04:/CA# openssl req -new -x509 -key ./private/cakey.pem -out cacert.pem You are about to be asked to enter information that will be incorporated into your certificate request. What you are about to enter is what is called a Distinguished Name or a DN. There are quite a few fields but you can leave some blank For some fields there will be a default value, If you enter '.', the field will be left blank. ----- Country Name (2 letter code) [AU]:CN State or Province Name (full name) [Some-State]: Locality Name (eg, city) []: Organization Name (eg, company) [Internet Widgits Pty Ltd]:Inc Organizational Unit Name (eg, section) []:www.skills.com Common Name (e.g. server FQDN or YOUR name) []:skill Global Root CA Email Address []: root@Server04:/CA# openssl genrsa -out apache.key 2048 Generating RSA private key, 2048 bit long modulus (2 primes) ...+++++ ........................................................+++++ e is 65537 (0x010001) root@Server04:/CA# openssl req -new -key apache.key -out apache.csr You are about to be asked to enter information that will be incorporated into your certificate request. What you are about to enter is what is called a Distinguished Name or a DN. There are quite a few fields but you can leave some blank For some fields there will be a default value, If you enter '.', the field will be left blank. ----- Country Name (2 letter code) [AU]:CN State or Province Name (full name) [Some-State]:China Locality Name (eg, city) []:ShangDong Organization Name (eg, company) [Internet Widgits Pty Ltd]:skills Organizational Unit Name (eg, section) []:Operations Departments Common Name (e.g. server FQDN or YOUR name) []:*.skills.cn Email Address []: Please enter the following 'extra' attributes to be sent with your certificate request A challenge password []: An optional company name []: root@Server04:/CA# openssl x509 -req -in apache.csr -CA /CA/cacert.pem -CAkey /CA/private/cakey.pem -CAcreateserial -out apache.crt Signature ok subject=C = CN, ST = China, L = ShangDong, O = skills, OU = Operations Departments, CN = *.skills.cn Getting CA Private Key ``` **四、创建apache目录及内容** root@Server04:/CA# mkdir /htdocs/skills -p root@Server04:/CA# echo "This is the front page of skills's website." >> /htdocs/skills/index.html root@Server04:/CA# echo "Staff Information" >> /htdocs/skills/staff.html **五、修改配置文件及重定向应用** root@Server04:/CA# vim /etc/apache2/sites-enabled/000-default.conf ``` <VirtualHost *:80> Redirect permanent / https://www.skills.cn/ </VirtualHost> <VirtualHost *:443> Redirect permanent / https://www.skills.cn/ SSLEngine ON SSLCertificateFile /CA/apache.crt SSLCertificateKeyFile /CA/apache.key </VirtualHost> <VirtualHost *:443> ServerName www.skills.cn DocumentRoot /htdocs/skills SSLEngine ON SSLCertificateFile /CA/apache.crt SSLCertificateKeyFile /CA/apache.key <Directory /htdocs/skills> Require all granted </Directory> <Directory /htdocs/skills/staff.html> AuthType Basic AuthName "login" AuthUserFile "/var/passwd" Require valid-user </Directory> </VirtualHost> ``` 创建认证用户 root@Server04:/CA# htpasswd -c /var/passwd zsuser <p></p></div></div></div> **4.SSH** · 安装SSH · 仅允许client客户端进行ssh访问,其余所有主机的请求都应该拒绝; · 配置client只能在Chinaskill22用户环境下可以免秘钥登录,端口号为3344,并且拥有root控制权限; <div class="panel panel-default collapse-panel box-shadow-wrap-lg"><div class="panel-heading panel-collapse" data-toggle="collapse" data-target="#collapse-27861864d4a2e2d872f896e0448b2ea360" aria-expanded="true"><div class="accordion-toggle"><span style="">Uos</span> <i class="pull-right fontello icon-fw fontello-angle-right"></i> </div> </div> <div class="panel-body collapse-panel-body"> <div id="collapse-27861864d4a2e2d872f896e0448b2ea360" class="collapse collapse-content"><p></p> **一、安装ssh服务** root@Server04:~# apt install openssh-server **二、编辑ssh配置文件设置端口** root@Server04:~# vim /etc/ssh/sshd_config port 3344 **三、重启ssh服务** root@Server04:~# systemctl restart ssh **四** **、设置规则** root@Server04:~# vim /etc/hosts.allow 只允许Client这个IP登录 sshd:10.10.100.1:allow 拒接所有 root@Server04:~# vim /etc/hosts.deny sshd:ALL **五** **、创建用户并设置免密登录** Client: 创建用户 [root@client ~]# useradd Chinaskill22 切换到Chinaskill22用户下 [root@client ~]# su Chinaskill22 生成密钥 [Chinaskill22@client root]$ ssh-keygen 复制密钥到服务器 [Chinaskill22@client root]$ ssh-copy-id root@ip地址 -p 3344 <p></p></div></div></div> **5.LDAP** · 安装openldap,为apache服务提供账户认证; · 创建chinaskills.cn目录服务,并创建用户组ldsgp ,将zsuser、lsusr、wuusr。 <div class="panel panel-default collapse-panel box-shadow-wrap-lg"><div class="panel-heading panel-collapse" data-toggle="collapse" data-target="#collapse-9a46cc314eb13fcfb595df1b83785cb656" aria-expanded="true"><div class="accordion-toggle"><span style="">Uos</span> <i class="pull-right fontello icon-fw fontello-angle-right"></i> </div> </div> <div class="panel-body collapse-panel-body"> <div id="collapse-9a46cc314eb13fcfb595df1b83785cb656" class="collapse collapse-content"><p></p> **一** **、安装服务** root@Server04:~# apt install slapd ldap-utils –y 输入密码  **二、修改ldap配置文件** root@Server04:~# vim /etc/ldap/ldap.conf BASE dc=chinaskills,dc=cn URI 192.168.10.4 192.168.10.4:389 **三、更新ldap配置** root@Server04:~# dpkg-reconfigure slapd    输入安装时设置的密码      测试是否安装好 root@Server04:~# ldapsearch -x ``` # extended LDIF # # LDAPv3 # base <dc=chinaskills,dc=cn> (default) with scope subtree # filter: (objectclass=*) # requesting: ALL # # chinaskills.cn dn: dc=chinaskills,dc=cn objectClass: top objectClass: dcObject objectClass: organization o: chinaskills dc: chinaskills # admin, chinaskills.cn dn: cn=admin,dc=chinaskills,dc=cn objectClass: simpleSecurityObject objectClass: organizationalRole cn: admin description: LDAP administrator # search result search: 2 result: 0 Success # numResponses: 3 # numEntries: 2 root@Server04:/etc/ldap# ``` **四、创建用户和用户组节点** root@Server04:~# cd /etc/ldap/ #进入ldap目录 root@Server04:/etc/ldap# vim group.ldif #新建文件group.ldif 后缀格式一定要对 ``` objectclass: organizationalUnit ou: users dn: ou=ldsgp,dc=chinaskills,dc=cn objectclass :organizationalUnit ou: group vim zsuser.ldif dn: uid=zsuser,ou=users,dc=chinaskills,dc=cn objectClass: top objectClass: account objectClass: posixAccount objectClass: shadowAccount uid: zsuser cn: zsuser userPassword: ChinaSkill22 shadowLastChange: 0 shadowMax: 0 shadowWarning: 0 loginShell: /bin/bash uidNumber: 1008 gidNumber: 1008 homeDirectory: /home/zsuser gecos: zsuser ``` **五、将创建的组和用户导入到数据库** root@Server04:/etc/ldap# ldapadd -x -D "cn=admin,dc=chinaskills,dc=cn" -W -f group.ldif ``` Enter LDAP Password: adding new entry "ou=users,dc=chinaskills,dc=cn" adding new entry "ou=ldsgp,dc=chinaskills,dc=cn" root@Server04:/etc/ldap# root@Server04:/etc/ldap# ldapadd -x -D "cn=admin,dc=chinaskills,dc=cn" -W -f zsuser.ldif Enter LDAP Password: adding new entry "uid=zsuser,ou=users,dc=chinaskills,dc=cn" root@Server04:/etc/ldap# ``` 接下来创建用户以此类推 **六、用户加入到组中** root@Server04:/etc/ldap# vim jr.ldif ``` dn: cn=jr,ou=ldsgp,dc=chinaskills,dc=cn objectclass: posixGroup gidNumber: 10001 cn: jr memberUid: zsuser root@Server04:/etc/ldap# ldapadd -x -D "cn=admin,dc=chinaskills,dc=cn" -W -f jr.ldif Enter LDAP Password: adding new entry "cn=jr,ou=ldsgp,dc=chinaskills,dc=cn" ``` **七、测试** root@Server04:/etc/ldap# ldapsearch -x -LLL | grep 'dn: dc' dn: dc=chinaskills,dc=cn root@Server04:/etc/ldap# ldapsearch -x -LLL | grep 'dn: uid' dn: uid=zsuser,ou=users,dc=chinaskills,dc=cn root@Server04:/etc/ldap# <p></p></div></div></div> 最后修改:2022 年 08 月 26 日 © 允许规范转载 赞 6 如果觉得我的文章对你有用,请随意赞赏