Loading... ## 实训目的 · 掌握交换机间的OSPF动态路由。 ## 实训背景 OSPF(Open Shortest Path First, 开放式最短路径优先)协议是一个内部网关协议(Interior Gateway Protocol,IGP),用于在AS(Autonomous System,自治系统)内决策路由。与RIP相比较,OSPF是链路状态路由协议,而RIP是距离向量路由协议。 OSPF 是专为 IP 开发的路由协议,直接运行在 IP 层上面,协议号为 89,采用组播方式进行 OSPF 包交换,组播地址为 224.0.0.5 (全部 OSPF 设备)和 224.0.0.6(指定设备)。当 OSPF 路由域规模较大时,一般采用分层结构,即将 OSPF 路由域分割成几个区域(AREA),区域之间通过一个骨干区域(AREA 0)互联,每个非骨干区域都需要直接与骨干区域连接。 ## 实训拓扑 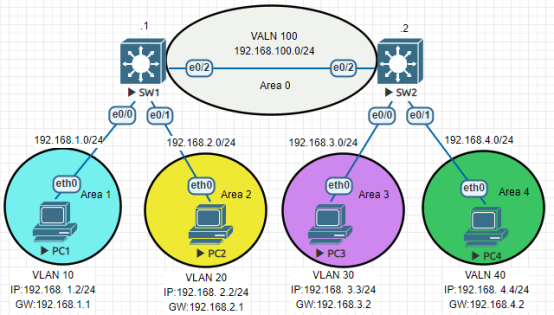 实验所需设备: 环境:EVE 设备: 4台PC,2 台三层交换机 ## 实训步骤 ###### 步骤1:基本配置。 SW1: ``` Ruijie>enable Ruijie#configure terminal Ruijie(config)#hostname SW1 SW1(config)# ``` SW2: ``` Ruijie>enable Ruijie#configure terminal Ruijie(config)#hostname SW2 SW2(config)# ``` ###### 步骤2:在SW1上创建VLAN 10、20、100。 ``` SW1(config)#vlan 10 SW1(config-vlan)#vlan 20 SW1(config-vlan)#vlan 100 SW1(config-vlan)#exit SW1(config)# ``` ###### 步骤3:在SW2上创建VLAN 30、40、100。 ``` SW2(config)#vlan 30 SW2(config-vlan)#vlan 40 SW2(config-vlan)#vlan 100 SW2(config-vlan)#exit SW2(config)# ``` ###### 步骤4:为SW1的VLAN划分端口。 ``` SW1(config)#int e0/0 SW1(config-if)#switchport access vlan 10 SW1(config-i)#exit SW1(config-if)#int e0/1 SW1(config-if)#switchport access vlan 20 SW1(config-if)#exit SW1(config-if)#int e0/2 SW1(config-if)#switchport access vlan 100 SW1(config-if)#exit SW1(config)# ``` ###### 步骤5:为SW2的VLAN划分端口。 ``` SW2(config)#interface e0/0 SW2(config-if)#switchport access vlan 30 SW2(config-i)#exit SW2(config-if)#interface e0/1 SW2(config-if)#switchport access vlan 40 SW2(config-if)#exit SW2(config-if)#interface e0/2 SW2(config-if)#switchport access vlan 100 SW2(config-if)#exit SW2(config)# ``` ###### 步骤6:为SW1的VLAN设置IP。 ``` SW1(config)#interface vlan 10 SW1(config-if-VLAN 10)#ip address 192.168.1.1 255.255.255.0 SW1(config-if-VLAN 10)#no shutdown SW1(config-if-VLAN 10)#exit SW1(config)#interface vlan 20 SW1(config-if-VLAN 20)#ip address 192.168.2.1 255.255.255.0 SW1(config-if-VLAN 20)#no shutdown SW1(config-if-VLAN 20)#exit SW1(config)#interface vlan 100 SW1(config-if-VLAN 100)#ip address 192.168.100.1 255.255.255.0 SW1(config-if-VLAN 100)#no shutdown SW1(config-if-VLAN 100)#exit SW1(config)# ``` ###### 步骤7:为SW2的VLAN设置IP。 ``` SW2(config)#interface vlan 30 SW2(config-if-VLAN 30)#ip address 192.168.3.2 255.255.255.0 SW2(config-if-VLAN 30)#no shutdown SW2(config-if-VLAN 30)#exit SW2(config)#interface vlan 40 SW2(config-if-VLAN 40)#ip address 192.168.4.2 255.255.255.0 SW2(config-if-VLAN 40)#no shutdown SW2(config-if-VLAN 40)#exit SW2(config)#interface vlan 100 SW2(config-if-VLAN 100)#ip address 192.168.100.2 255.255.255.0 SW2(config-if-VLAN 100)#no shutdown SW2(config-if-VLAN 100)#exit SW2(config)# ``` #查看SW1、SW2配置 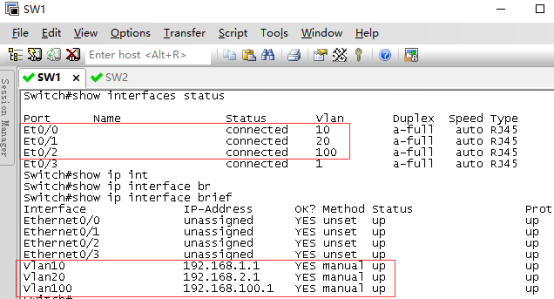 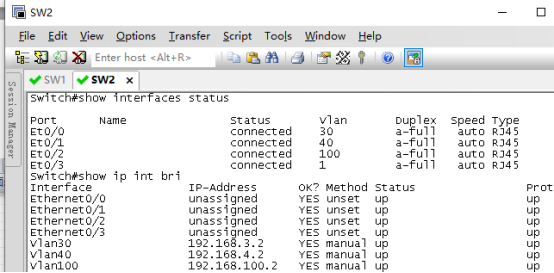 ###### 步骤8:为四台PC设置IP。 PC1: 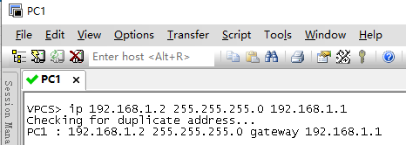 PC2: 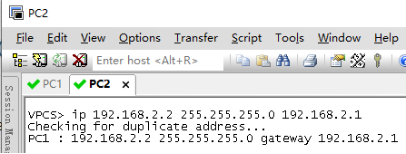 PC3: 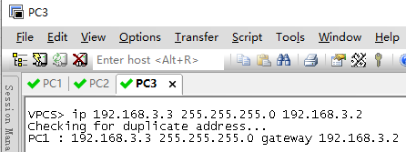 PC4: 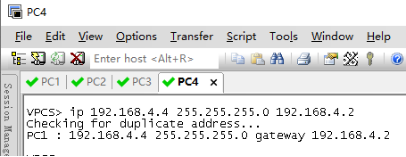 ###### 步骤9:使用PC1测试和PC2、PC3能否通信。 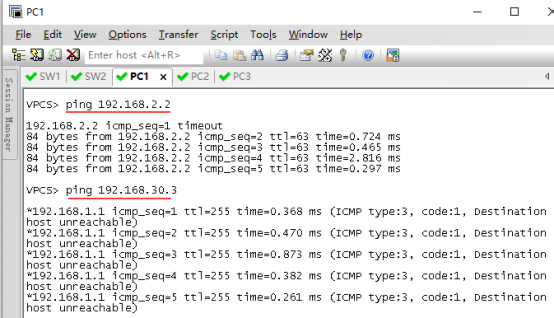 通过验证不难发现,同一个交换机的两台计算机是可以相互通信的,但不同交换机上的计算机还是不能通信。 ###### 步骤10:配置OSPF动态路由,实现全网互通。 SW1: ``` SW1(config)#router ospf 1 //进程号为1 SW1(config-router)#network 192.168.1.0 0.0.0.255 area 1 //宣告网段为192.168.1.0,区域为1 SW1(config-router)#network 192.168.2.0 0.0.0.255 area 2 SW1(config-router)#network 192.168.100.0 0.0.0.255 area 0 SW1(config-router)#exit SW1(config)# ``` SW2: ``` SW2(config)#router ospf 1 SW2(config-router)#network 192.168.3.0 0.0.0.255 area 3 SW2(config-router)#network 192.168.4.0 0.0.0.255 area 4 SW2(config-router)#network 192.168.100.0 0.0.0.255 area 0 SW2(config-router)#exit SW2(config)# ``` ###### 步骤11:通过路由表查看OSPF是否配置成功。 ``` SW1#show ip route ``` 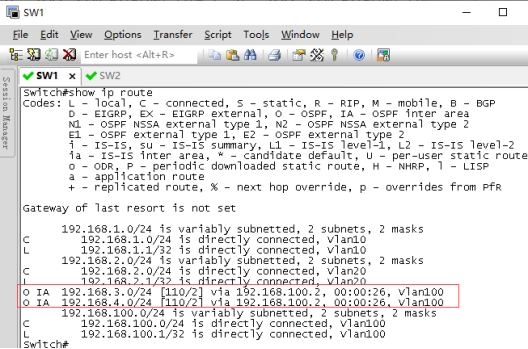 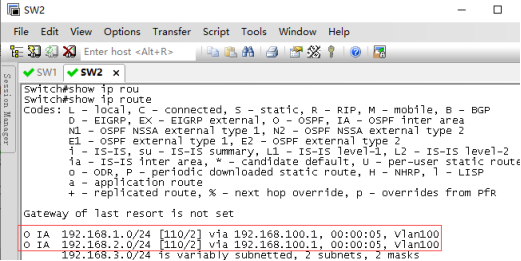 ###### 步骤12:再次使用PC1去Ping PC3、PC4,发现可以Ping通了。 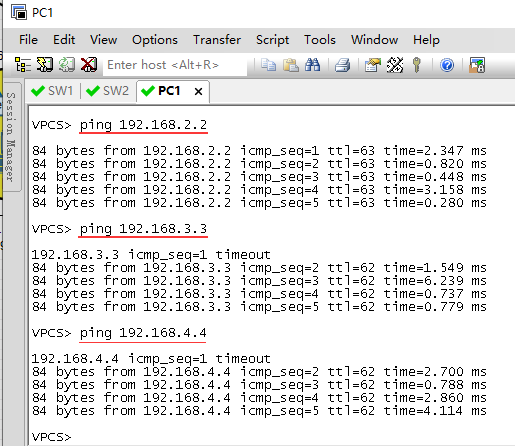 ###### 步骤13:配置验证 查看相邻的路由器之间是否建立ospf邻居关系,及邻居状态。若相邻路由器能够正常建立邻居关系,且状态为full,则ospf运行正常。  ## (可选)调整以太网接口的ospf网络类型 说明: 以太网接口的默认ospf网络类型为broadcast,有40秒的wait时间来选举DR/BDR。建议点到点的以太网互联接口,将两端的接口ospf网络类型都配置为point-to-point ,加快ospf邻居关系的收敛。 ``` SW1(config)#interface e0/2 SW1(config-if)#ip ospf network point-to-point ----->调整接口的ospf网络类型为point-to-point (链路两端ospf网络类型必须一致) SW1(config-if)#exit ``` ``` SW2(config)#interface e0/2 SW2(config-if-)#ip ospf network point-to-point SW2(config-if)#exit ``` 最后修改:2022 年 05 月 22 日 © 允许规范转载 赞 如果觉得我的文章对你有用,请随意赞赏